Module 2 - Balance
Foundational Principles
As we begin our exploration of body mechanics and how it relates to the animation process we must reinforce the importance that the 12 principles of animation be considered and utilized throughout. Trying to approach more believable and realistic body animation without the foundational principles is like trying to do interior decorating in a house without framing and building it first.
In body mechanics we will be focusing intently on very intricate and minute details of every frame to attempt to create the absolute best animation we possibly can for each assignment. We are only going to be producing 4 complete animation assignments in this class and each one will be spread over multiple weeks. The only way we can achieve the realism and believability required is through the use of the foundational animation principles you were introduced to in the Animation I class. The use of arcs won't inherently create a believable sense of balance, but the use of good arcs will enable it. The use of staging, timing and follow-through won't inherently create a sense of extreme weight, but their use will absolutely enable it. The principles are tools like a pencil to an illustrator. There are many different weights and types of pencils that when in the hands of a master will produce the perfect marks on the page to reveal the masterpiece within. Those very same pencils in the hands of my 3 year old will produce a very different image. One must master the principles (pencils) and all of their uses before the artist can reveal the masterpiece within. Our attempts this semester will be to take the mastery we have gained with the principles from Animation I and apply them to a greater end in the next step of our journey in animation. That step is less of a focus on specific techniques and more of a focus on art and accuracy with body mechanics.
Body Mechanics
Body Mechanics is the art of mastering the form, motion and subtleties of body motion to create a believable sense of weight, balance and realism. You can have the most realistic model ever created with the most believable shading and lighting and still flub the entire scene because the pose of the character while she waits for the bus is wrong. Body mechanics is something that we all are experts at. You spend your entire day (with the exception of those entire summer days you spent locked in your room playing DOTA or Uncharted) watching people move throughout our world. You have spent your whole life learning to master the mechanics of your body to roll over, crawl, walk, run, jump, type, swim, etc. You even learned (hopefully) at a young age to master those crazy appendages that are attached to your body to stop hitting yourself in the face or to get that spoon of applesauce in your mouth rather than up your nose or in your eye. You have been practicing all your life to be an expert at not falling down when you stand still; Not tipping over when you ride your bike; Not falling over when you carry something heavy.
The Ever Important question of WHY?
Our attempts this semester will be to take your expertise in all of these areas and apply them to our digital characters as we animate them to act out various tasks in the computer. Beyond just getting the posing and timing right we will be focusing intently on the subtle poses and motion of the head, finger tips, angle of feet and pose of the spine and how all of these things change as our characters flow through the shot. Not only the visible position and motion, but WHY is that motion there. Does posing the hand slightly higher as the heavy box is lifted make the box feel heavier? Does it show us the character is less certain they can even lift the box? Does the arch of the spine and lean show us our character is confident as he leans agains the wall or shy? Absolutely everything you do in animation requires a great amount of effort from you as the animator. If you do something you should know exactly why you are doing it likewise for occasions when you don't do something. The answer to every question WHY? should never have the response BECAUSE or I DON'T KNOW. If you don't know then find out why. If you don't care then get your feelers in order to start to. Your ability to master the question of WHY? will distinguish you as potentially a great animator from a mediocre one.
Workflow Review
So to get started we are going to learn a workflow that breaks the process of animation down into nice manageable chunks. This helps to make the process as clear as possible and easier to troubleshoot. It is also a way to describe to yourself or others what part of the process you are in.
Planning
Planning is essential to animation. For every frame you see on the screen, an animator will have gone through tons of ideas on paper and on video to hone the performance down to the most communicable and entertaining idea possible.
If I could give one very strong point of advice, it would be to NEVER! underestimate how important your planning process is. At first you may feel antsy to begin using the computer, but don't do it. Plan your shot meticulously. You will find that in the polishing stage rushed planning will almost always negatively affect your shot.
Balance
Many times, when a pose doesn't quite look right, or when an action isn't working properly, it is because the character is off balance.
If a character is off balance, they will fall. So, unless that is your intention, make sure your character is always in balance.
How do you balance your character?
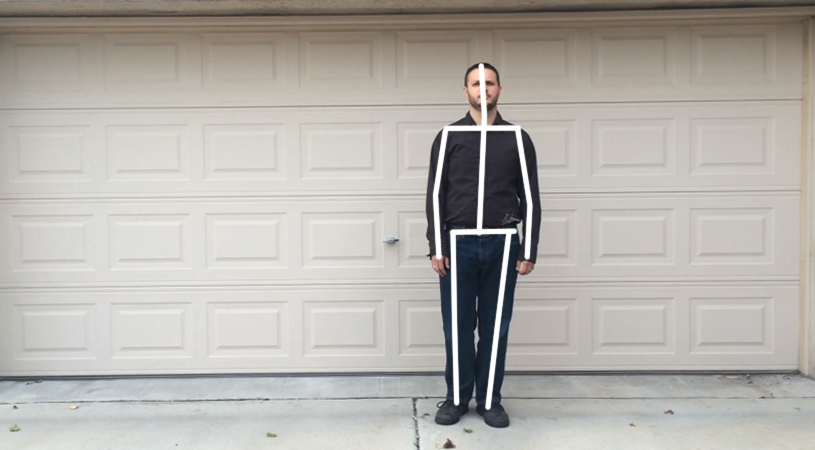
Generally speaking, a person will favor their weight over one foot. In most of these cases a character's chin will be centered over the weight bearing foot. When the character is in a pose that is more dynamic or out of the ordinary, their weight may be balanced in other ways. Let's take a look at a couple of examples.
Notice how her weight is over her screen right foot. If you draw a line from her chin down to her screen right foot, you can see what I was referring to.
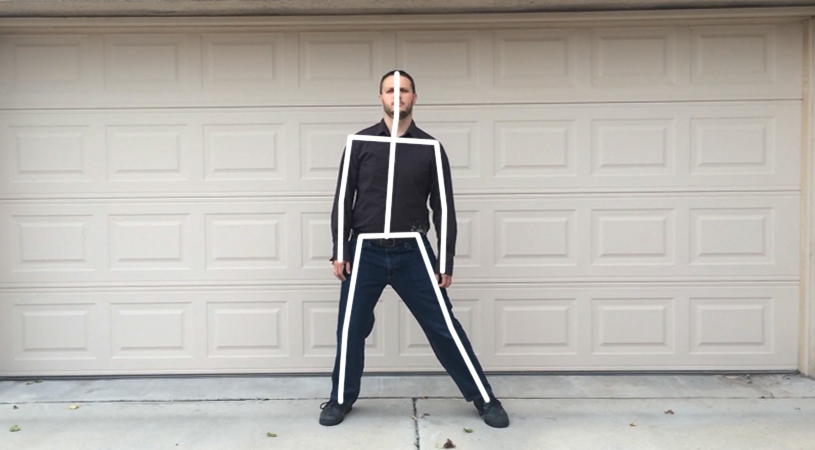
Same thing happening here in this example. These poses feel somewhat casual.
You can have a very dramatic pose and still require balance. Search the internet for different yoga poses to see some pretty crazy examples.
Video Reference
When planning out a shot, the quickest way to experiment with different ideas is to do video reference. When working with characters, you can try tons of acting choices very quickly in front of the camera, and when you find something you like, you have the video of the action ready to digitize on your computer for invaluable reference you can come back to again and again while working on your shot.
For body mechanics one of the greatest pieces of general reference you can have is parkhour. Even better if you are the one doing it. Parkhour is a training discipline using movement that developed from military obstacle course training. Practitioners aim to get from one point to another in a complex environment, without assistive equipment and in the fastest and most efficient way possible. In short this is video of people using only their body to navigate complicated environments in the most efficient way they can.
Note
Watching only professional parkhour will give you reference of people who are incredibly addept at mastering the motion and physicality of their body. If you are animating an aging or overweight character their motion as they run, jump, sit, stand is going to be very different. Ensure that your reference matches your intended result
I mentioned recording yourself doing parkhour as a great idea. Not only are you going to have the visual reference to the motions you will see on screen, but you will have the physical memory in your body of what that motion felt like. What was difficult to do, where you were straining, etc.
Thumbnails
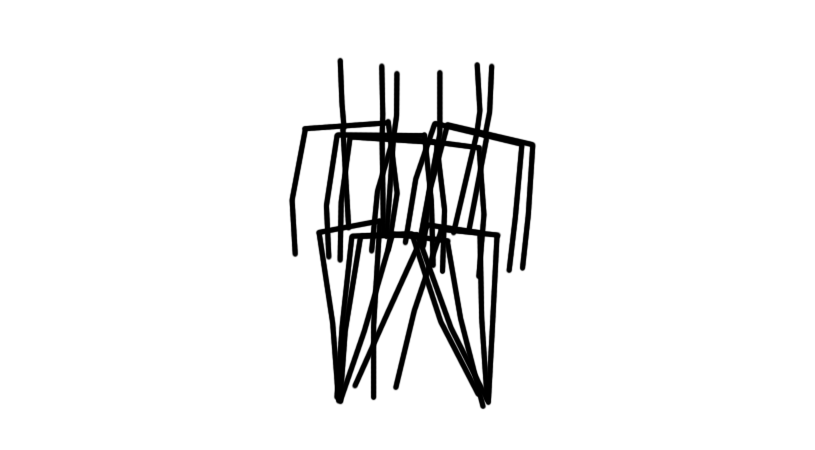
Once you have your Video Reference, you will use it to draw out thumbnails for the action in your shot. Now is where using something like quicktime that allows for use of left and right arrow keys to step frame by frame through your video while having the actual frame number visible instead of timecode comes in really handy! The thumbnails you draw shouldn't be detailed in terms of style. A simple stick figure with lines representing the body, shoulders, hips, arms, legs and head will suffice. You can also use circles to represent other volumetric forms of the body including head, belly etc. Also, the complexity of how many thumbnails you draw can be as indepth as you would like them to be. I recommend that you atleast draw the keys and potentially the main breakdowns as you can see in the overlay example below.
You can use pencil and paper or your computer for this. Whatever is quick/comfortable for you. On the computer you can even capture the key frames and trace over them as seen below in the examples below.
 Click on the image to view full screen
 Click on the image to view full screen
 Click on the image to view full screen
 Click on the image to view full screen
When you set a keyframe, you are telling the computer that you want the character (or ball) to be in that exact posed position on the frame you set the key. There might be hundreds of keyframes in a shot and different key frames for different parts of the character being animated, so we will be classifying keyframes so that we can more properly refer to each keyframe by what it is intending to do for the animation.
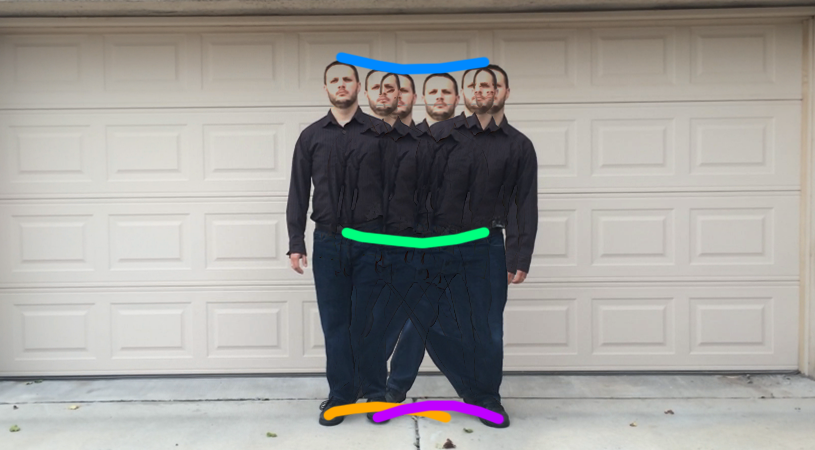
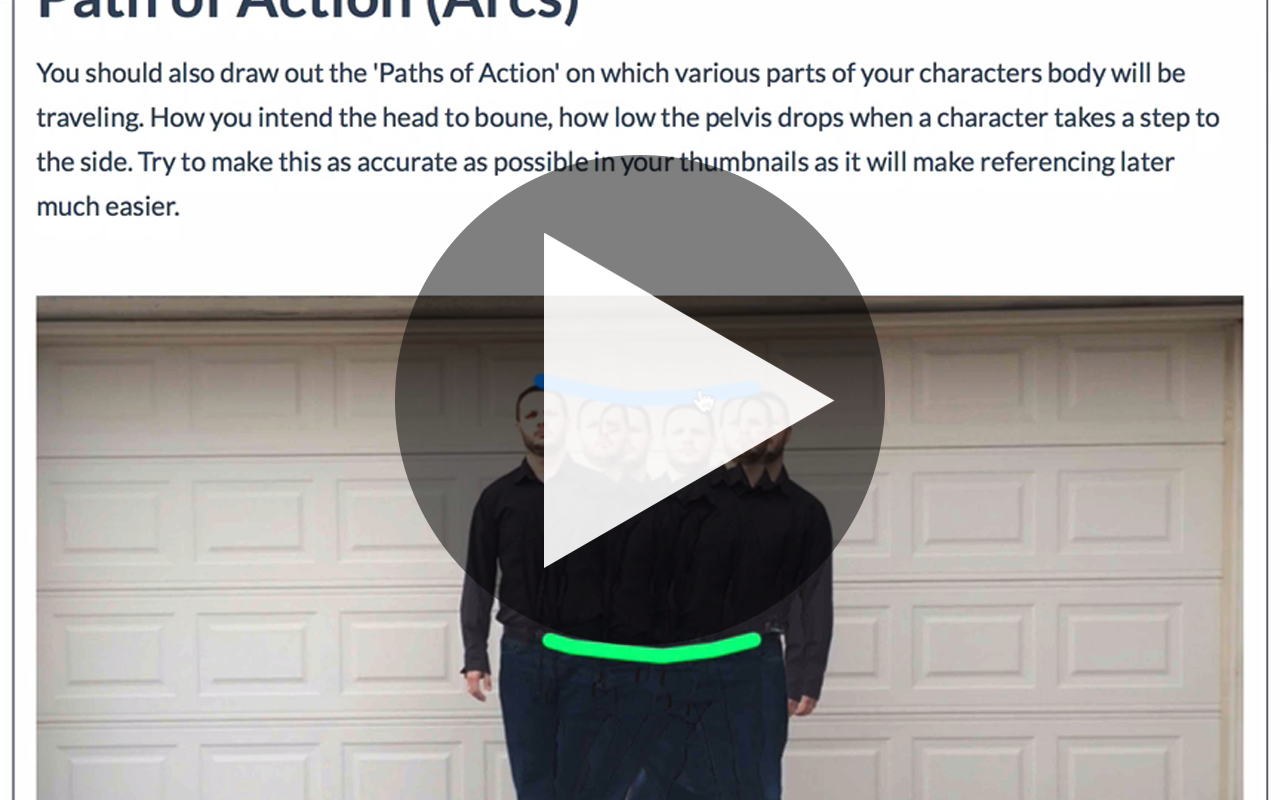
Path of Action (Arcs)
You should also draw out the 'Paths of Action' on which various parts of your characters body will be traveling. How you intend the head to boune, how low the pelvis drops when a character takes a step to the side. Try to make this as accurate as possible in your thumbnails as it will make referencing later much easier.
 Click on the image to view full screen
Keys
Usually when speaking of your 'Keys' you are referring to your 'Key Drawings' or 'Key Poses'. Another way to identify a keyframe is when a main event, action, change takes place. These are your storytelling poses, simply referred to as 'Keys.'
Breakdowns
Keyframes may be the most important frames, but you will also want and need to control how the character (or ball) moves from one key to another. To do this, you will be modifying your breakdowns. You may have also heard them called inbetweens or tweens because they fall 'inbetween' your keys. These breakdowns describe arcs, spacing, and other important movement information inbetween your storytelling keys.
Depending on the shot being animated you may or may not want or need all breakdowns. Whether you draw them out or simply analyze the video reference you must consider the breakdowsn as it will be hugely important in body mechanics.
One final note: Do your thumbnails so that they will work as a tool for YOU. Please don't just copy the examples I have done here, this isn't a workbook assignment or a quiz. This is a guideline for YOU to use when you produce your animation. Make it clear, make the information relavant, and USE YOUR THUMBNAILS!
Blocking
For blocking you are simply taking your character and putting it into the position of each of your thumbnails at each of the frames for your thumnbsnails. If you are doing 2D animation these will be hold frames. If you are doing 3D animation you will set your graph editor curves to stepped in order to avoid seeing any fluid motion between keys.
This step is essential to get your process going for animation. Your temptation will be to start working with the subtleties of the splines, inbetweens and polish. Avoid this until you know that your blocking phase is complete. It is so much easier to make large changes to the timing of your animated shot in blocking than if you start splining to early.
Malcolm 2.0 Rig and Anim Picker
This semester we will be using the amazing Malcolm 2.0 Rig provided free by Anim School for all of our animation assignments. In addition to the rig they provide an amazing UI toolset to customize and work with the rig called the AnimSchool Picker. There are subscription and paid versions of these tools, but the free versions are more than adequate for all we need.
Please follow the link below to download and install the rig and picker. You can use Malcolm without the picker tool, but it is a lot easier to use if you have the picker tool installed. The instructions and support to install the picker can be found on the website as well.
First, a quick review of how to setup a new maya project.
Next you are going to want to do your best to download and install the malcolm 2.0 rig provided by AnimSchool. This rig is awesome! and the plugin they provide to work with the rig is really awesome, but it can take some work to get it installed. I have provided an installation video below and the AnimSchool also has videos for installation too. I had some trouble installing in Maya 2024, so I will be using maya 2023 for this class. Hopefully you have better luck, but you can go and install the older version of maya from your license as well if you need.
FIRST! Download and Install Malcolm and Picker
How to use Malcolm Rig
Download and Install AnimSchool Malcolm 2.0 Rig & Picker Tool
Assignment
For your first assignment you will be animating your character taking a single side-step. Take a look at this sample reference I shot to show you what you will need to produce yourself. Please make sure you take a normal side step. Try not to over-exaggerate the move if you can. Take a large step so you can really see the balance in your body at work.
Linear from Brad Swardson on Vimeo.
- You may shoot your reference video on a professional camera or your phone. However your record the video I would recommend using the best quality you have access to. You will need to capture or save this video to your computer and get it converted to a mp4 video. You can do this conversion with Adobe Premiere, After Effects, Final Cut Pro, iMovie, etc.
- You may draw your Thumbnails on paper and scan them in for submission, or you can do them digitally.
- Your blocking animation should be export out of Maya as a playblast video encoded as mp4. Again if you have to export .avi from your maya then Follow these tutorials to convert to mp4 for submission.
- Once complete submit just your blocking mp4 to Assigment 1 on UNM Canvas before midnight next Sunday.
-
Class Material
Read and watch class materials for this module