Module 6 - Iterative Process
Overview
For the next 5 weeks we are going to be shifting gears a little bit to talk about some of the practical processes, tools, and approaches used in game design and development in general. Most of these next 5 modules are going to take a much higher level look at games, but we will be still continuing to utilize specifics and examples as we go. So get your big picture and small picture glasses ready, and let's get to it!
Games are stupidly, insanely, massively, idiotically complex...
There, I've said it. Games are hard to make even if they can be easy to play. Even if the concept of a game is easy to grasp or even if it is very easy to play, they still can be really hard to make. Just take a look back at all of the concepts we have covered so far in the first 5 weeks of this class.
- 6 Elements of Game Design (Simple, yet so nuanced)
- Systems Thinking (Yea... complex)
- 10 Game Design Tools (Let's be honest, There are really 15 there)
- 10 Different Kinds of play (How do you choose?)
- 7 Concepts of Player Experience (Are we really all that different from one another? Yup)
That makes over 35 different concepts to consider just to get a game concept in place (Don't worry, there is more coming next week!). Furthermore as you get into the process of actually developing a game you will quickly find that things you design may make perfect sense and be perfectly simple to describe and understand logically, but once you start to try and implement that logic where you have to control every aspect of it... yeah, things get difficult real fast. Why would anyone want to take on such a feat? Why indeed.
Obviously people take on these tasks on a daily basis and some absolutely amazing, stunning and fun games have been created across the spectrum of types of games for us to play. So how do they manage to navigate this crazy world to get these games designed and developed?
To take on anything complex in life you need processes and the best kind are the ones that have been battle tested by many different people over a long period of time. Compounding all this is the fact that game designers can't really "see" their design until they are played, and their games can't be played until they are made.
Enter... Iterative Process
Iterative design is a cycle of steps that are taken and repeated over and over until the product is complete, or time runs out, or both. Iterative design is a cycle of:
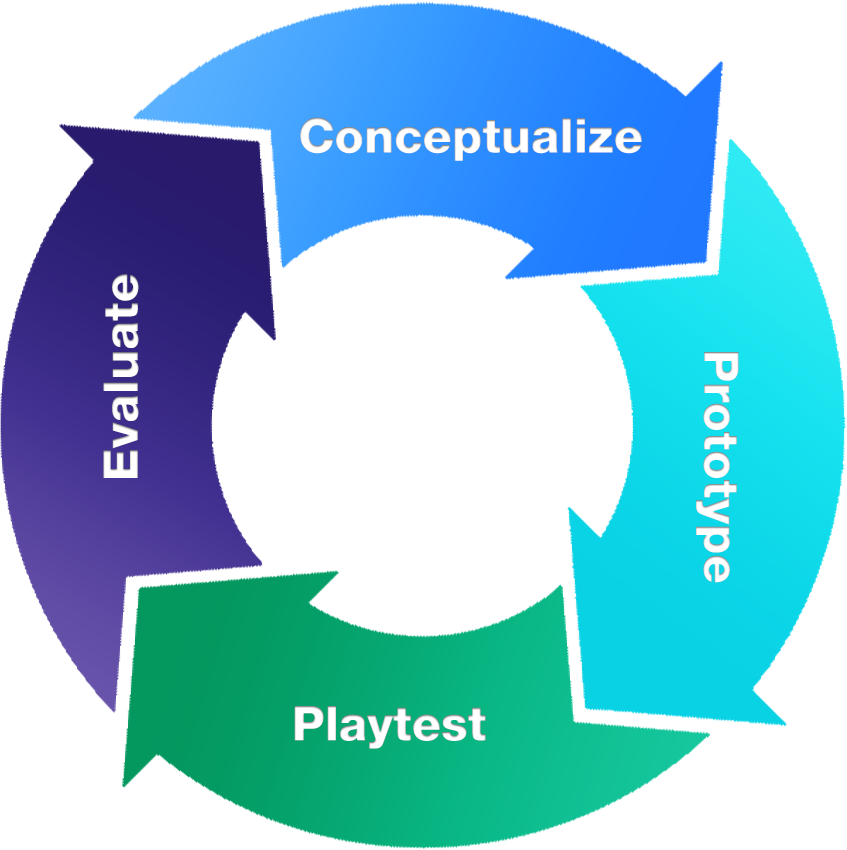
- Conceptualization
- Prototyping
- Testing
- Evaluation
Macklin, Colleen; Sharp, John. Games, Design and Play (Game Design) (p. 106). Pearson Education. Kindle Edition.
Let's now dig into each of these iterative steps!
Conceptualize

Idea
To get anything going all you need is an idea. This idea can be anything and can come from anywhere. It could be a base concept of a story (In a hole in the ground, there lived a Hobbit) -- A basic concept of a common game object (What else could we do with this hoop?) -- A cool action (Levitation!) -- Or even the desire to share a feeling that is difficult to put into words (That feels right, doesn't it?). Game concepts can start with anything. The important thing to remember in conceptualization is that only the basis for ideas need to be explained... not every single detail. In-fact, the thing to arrive at in this earliest stage is not an answer at all, but a simple "How might we..." question.
- How might we make a game with this golf club and a ball in the woods?
- How might we share the feeling of the smell of rain after a long drought?
- How might we take serious topics in life and make them easier to discuss through humor?
Brainstorm
Once a basic question is in place then you move on to brainstorming. Brainstorming is a process with specific rules meant to help participants explore all the possibilities around an idea or question. In fact, brainstorming is like a game—one that generates as many concepts as possible. And those concepts come in the form of even more questions, ones that begin with “what if...?”
- What if instead of hitting the ball with the club, we make the club the goal and you must throw the ball to try and hit it?
- What if we utilized other senses like sound and sight to stimulate the sense of smell?
- What if instead of giving people specific topics, we let them choose one?
The biggest thing to remember in conceptualization is, it is not a complete design. These are just ideas, mostly in the form of questions. Even the simplest of ideas can move on to prototyping where some simple playable elements begin to be born. Don't dive too deep too soon. It's best to keep things as simple as possible for as long as you can before adding more details or complexity in future iterations of the process.
Prototype

The second step in the iterative game design process is turning the game idea into a prototype. The best way to figure out how the game will look, feel, and act is to dive in and start making it. The faster the game moves from the pure ether of ideas and into a prototype, the closer the game will get to showing the kind of play experiences it can generate.
The key to prototyping is to turn the most promising “what if...” question from the brainstorm, or a combination of “what ifs,” into something tangible. That could be paper, quick and dirty code, even the designer’s own body performing the actions of the game. The cool thing about prototyping is that it will help ideas get even more developed and might even lead to a discovery that would have never come up during the concepting phase. This is the point of the iterative process. Every step along the way initial ideas evolve—from a pie-in-the-sky idea to a fully designed game. It isn’t necessary to figure it all out in the beginning; being open to the whole process and where it takes the game is the important thing.
Macklin, Colleen; Sharp, John. Games, Design and Play (Game Design) (pp. 110-111). Pearson Education. Kindle Edition.
The initial prototype of a game can involve just the simple exploration of your what if questions to begin to explore the ways the game could work. Your prototype could be as simple as talking through the game conceptually, or creating paper cutouts or simple representations of game pieces or possibly even testing out ideas in a game engine with developers.
The purpose of prototype is to test out your ideas in their simplest forms to see if it works, and if other ideas come out as well.
Playtest

Once a game designer has a prototype made, they will want to playtest. After all, a game designer doesn’t really know what the game is until they test it. Playtests reveal what is or isn’t working in a game’s design. In other words, the playtest is the answer to the “what if...?” question the prototype asks. In fact, playtesting is the one step in the process that we end with answers, rather than questions. And not only answers in the form of seeing what happens when playing with a prototype that asks “what if unicorns jousted with dinosaurs...?” Answers to other questions as well, like, “Do players understand the goal of the game, and what they are striving for? Do players have the hoped-for emotional response? Do players get the game’s message? Is the user interface clear or difficult to understand? And, is there clear feedback about how well the player is doing in the game?”
Macklin, Colleen; Sharp, John. Games, Design and Play (Game Design) (p. 112). Pearson Education. Kindle Edition.
Playtesting is really hard for designers to do and endure. It is in testing that all of the holes in your ideas come out. The best practice is to maintain as much discipline as you can not to coach your players excessively or to take their responses too personally. The testers are there to help you because testers are players. The game you create is actually 'made' inside of your players. To get to the place of creating the game you want you must learn how players 'make' your game and then iterate your design until what you want to create... happens.
Evaluate

Once a game designer finishes a round of playtesting, they evaluate the results to assess the game’s design. The art of evaluating the results of a playtest is taking what playtesters did and said and determining if and how the feedback necessitates changes to the game’s design.
Macklin, Colleen; Sharp, John. Games, Design and Play (Game Design) (p. 113). Pearson Education. Kindle Edition.
Evaluation is all about taking the answers you learned from playtesting and assigning meaning to that knowledge in the form of new questions that will require new conceptualization questions to solve. You may end up realizing that core concepts of your game aren't working in the slightest. You can choose to abandon those concepts or completely change a major approach of your game or you can dig into them further with some "how might we" questions.
Being a game designer is not about coming up with perfect ideas right off the bat. The challenge of game design is paying close attention to how other people engage with game prototypes and then translating that feedback into design revisions to be tried out in the next prototype. Some of the feedback from players will be pretty straightforward. Other feedback is more difficult to diagnose, like, “I feel like this game is too intense.” It takes practice, kind of like a doctor hearing a patient talk about their symptoms and then from that, building up enough evidence to make a diagnosis. It involves not only listening to what the patient says, but observing them and including all of that into the evaluation.
Macklin, Colleen; Sharp, John. Games, Design and Play (Game Design) (p. 114). Pearson Education. Kindle Edition.
Fail Forward
As we discussed in last weeks module "Player Experience" we learned the value that failure has in our players learning and growth process. The process of designing a game is in-and-of-itself like playing a game. In order to "level-up" your game from one step to another you have to see areas where you have failed and utilize the things you learn at those steps along the way that will help you move forward toward your goal of beating the game (Getting it made and played).
Failure is what helps us learn and make our games better. The key is to be aware that it will happen, and when it does happen, to address it as a team and identify possible solutions. The best way to leverage failure to improve the game’s design? By failing fast, with purpose, early in the game design process. This means doing your best not to get discouraged by it and view it as a learning experience. Another way to put it is that your first time at anything will inevitably involve learning from failure. Remember the first time you played your favorite videogame? When we play videogames, failure teaches us how the world works in the game. In game design, failure teaches us how to make better games.
Macklin, Colleen; Sharp, John. Games, Design and Play (Game Design) (pp. 115-116). Pearson Education. Kindle Edition.
Assignment
For this assignment we are going to keep things simple and easy to practice our introduction to this iterative process.
1 You must find a partner to create a simple game and work through the process. We will be doing this in class lab this week. If you were not in class then just get another person to do this exercise with you. You might consider recording these processes for later analysis.
2 Using just your bodies and items found in the room you are in I want you to work through the iterative process in 15 minutes one time. Conceptualize for 3 minutes. prototype for 5 min. Playtest for 5 min and evaluate results for 2 min. Set a timer for each step and move on at the end of the timer even if you don't feel like you are ready.
3 Take notes on your findings from this first iteration. What did you come up with? What did you prototype? How did playtesting go? What are your completion questions for next iteration?
4 Then I want you to iterate over the whole process again taking what you learned from the first iteration for another 15 minutes. Try adding in iterative variations to the game as you go. Conceptualize for 3 minutes. prototype for 5 min. Playtest for 5 min and evaluate results for 2 min. Set a timer for each step and move on at the end of the timer even if you don't feel like you are ready.
5 At the end of your second iteration please consolidate your notes on each step being sure to document changes and reasons in your second iteration and their success/failure as well. We will present these findings at the end of the lab. If you were not in class please submit these findings in a word document on UNM Learn.
6
Submission: Once complete please save the Word Document with a file name matching this format. Replace 'Lastname-Firstname' with your actual name.
'Lastname-Firstname'_Assignment6.docx
(Example: Swardson-Brad_Assignment6.docx)
7 Click on Assignment 6 in the UNM Canvas Assignments Listing.
8 Scroll down to Assignment Files and Browse Local file to select the file you created and attach it to your submission for this assignment.
Please make sure you also complete the other requirements in your todo list like discussion post and quiz. Don't forget those.