Module 8 - Level Design & Player Guidance
Overview

Alright, it's time to take this class to the.... next level
Ah... nothings starts a new module like a good old pun.
This week we are going to be looking at breaking down a lot of the high level (level.. haha!) concepts we have learned so far this semester and breaking it down into specific examples and approaches to game design mechanics and approaches. In this case specifically how as game designers we are given the enormous task of not only providing the world in which our players will exist and operate within our game, but also how the heck we get them to where we want them to go. And... oh, by the way, hopefully ensure they have fun while doing it.
This week we won't be pulling content from our recommended book, but I did find some amazing resources online that I will be providing links to as we explore these topics. There's no sense in recreating or replacing amazing insight and content when you have access to it. Isn't the internet an amazing place sometimes? I'll provide links and attributions throughout, but huge thanks in advance to Mike Stout for his articles and blog posts that provide great first person insight into game design concepts and approaches.
Constraints
Ah... constraint again. I think this is the third time we have talked about it in just the first half of this class. While this might seem overkill, there is a reason it is so heavily covered. As mentioned previously, constraint is one of the biggest aspects of our experience of life, and an amazing and powerful tool for story-tellers, content producers, and game designers to use in the execution of their craft
For the next five sections of our module we are going to be referring to content provided by Mike Stout in the article/tutorial he posted on envatotuts+. I will provide you with a link to the article and will reference the section with some additional commentary provided. Please make sure you read every section on the article as thoroughly as you are reading this now.
Link to overview of constraints in level design
Read through the entire section on constraints in the tutorial link above. Then come back here to continue...
There are a number of examples of constraints used in this tutorial that have been alluded to in previous modules, but not explicitly covered. The mention of business, franchise, legal, and engine constraints are things we will cover more next week. Some of the more specific callout of audience constraints and general constraints a great questions that you should always consider when designing anything. Game or not.
For the major focus of this lesson on level design I want you to pay special attention to the four critical questions as you begin designing not only levels, but the full game itself. Especially for larger more narrative or exploratory games.
- What is required by the level's story, theme, and plot?
- What are my set-pieces?
- What metrics am I constrained by?
- What does the game's "Macro design" require from this level?
You HAVE TO make sure that every decision you make points back to supporting the greater purpose for why the game exists in the first place. If you don't have a clear answer, then you MUST question your decision to include it. Let these be your compass as you navigate this world of design, because your players will be doing so even if you don't.
Ideas and Structure
Creation has to start somewhere. The blank page doesn't start getting text on it, until you start writing. The piano is just a pretty piece of furniture until you start hitting the keys. Your game is just a fun and interesting concept until you start getting things built out.
We have already talked about some of the game design process with iterative design and brainstorming. With iterative design and adaptive processes you are going to be constantly iterating and enhancing your approach as you go. Sometimes at the macro-level (Big Picture glasses) and sometimes at the micro-level (Small picture glasses). When you start breaking down level design you are going to be taking smaller and smaller viewing approaches to the design, but always understanding how those design decisions fit into the bigger picture as a whole.
Link to overview of brainstorming and structure
Read through the entire section on brainstorming and structure in the tutorial link above. Then come back here to continue...
Overall the process of brainstorming and coming up with a structure is to outline ideas and explore concepts, but without spending a lot of specific time on details until those details are good enough to explore deeper, or are approved to move forward with. Structural outlines should be simple in depth and description to allow you to feel comfortable throwing things away as you iterate.
Think of this like napkin sketches or sticky notes on a white board. You don't feel bad throwing away these thumbnail sketches or simple notes because not a lot of time and effort is put into them. But if you are modeling out a level design and fall in love with a very specific aspect of a design you have working, but don't realize that its actually hurting your overall big picture design, it is a lot harder to throw it away.
Keep things as simple as you can, for as long as you can. Then only add detail because you have to.
Diagrams
Link to overview bubble diagrams
As your refine your concept from idea, to outline and structural description you can also use other types of design methods to explore, organize, and communicate your ideas within yourself and to others. Visual methods like diagrams are a fantastic way to do so.
In the case of level-design you are responsible for guiding a player from a start point to an end-point. It is possible that the guidance isn't as important as the experience while exploring, but if you as the designer don't have a clear idea of where you player can/should go and what they can/can't do and more importantly "WHY" they would be going and doing what they are doing. Then your players will have absolutely no idea either.
The blog post that is linked within our tutorial points back to Mike's personal blog called "Chaotic Stupid" (funny name :) describes different kinds of bubble diagrams to describe at a high level where the player can, or should go within a level. There are lots of ways to represent this, but I really liked the simplicity of example between common Path types (Linear, Forked, Spider-web)
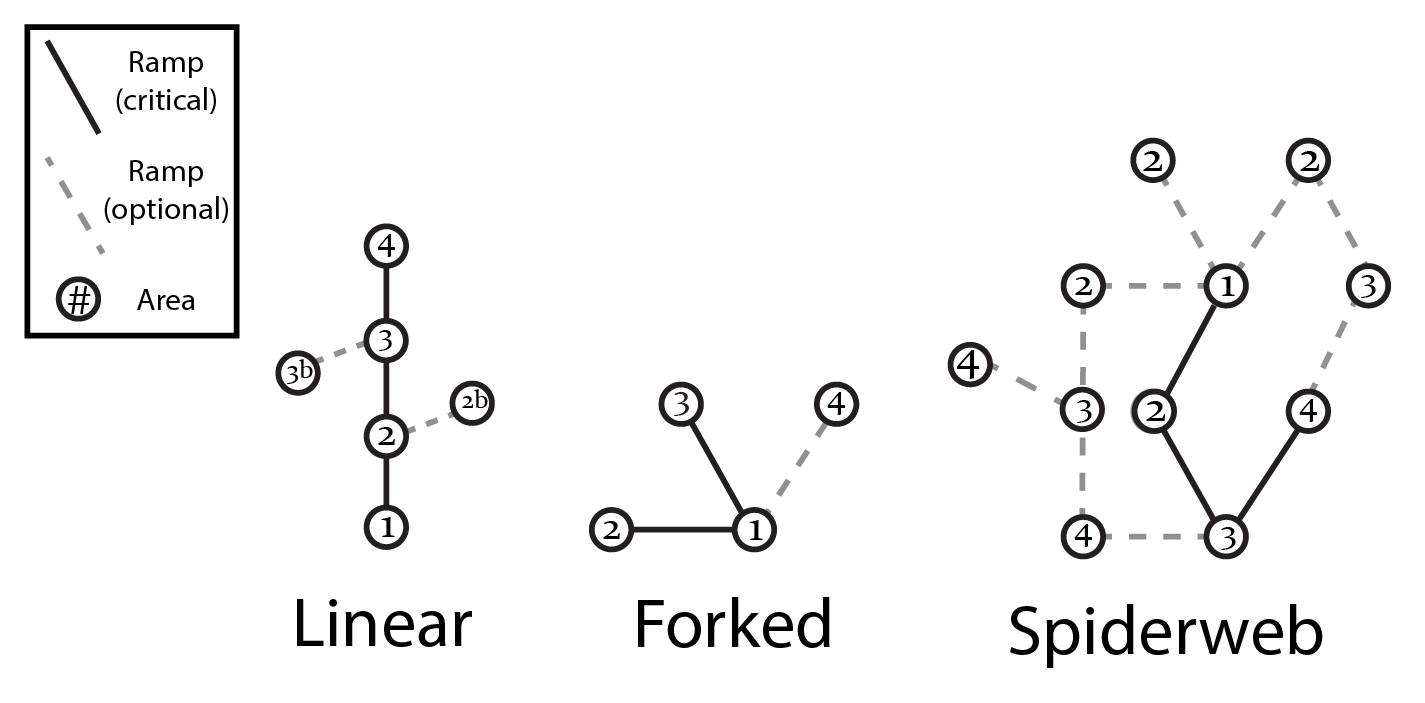
No matter what format you use in design, these simple maps and representations help to iterate very easily over concepts in level design and are super cheap to make, adjust, and discard.
Rough Maps
Link to overview rough maps
Let the iteration continue :)
Once you have a basic flow of the areas of the level and how the player can navigate those areas, you will need to start to iterate on what each of those areas will look like and how they could flow from one to another.
As you get more and more refined with your ideas on how the level can and should be laid out, you refine your design to include more and more detail as you go. As your refine your designs this will require a lot of jumping from big picture to small picture within the level itself, as well as ensuring that the biggest picture of the entire game, or franchise (if applicable) is considered as well.
Beyond just the actual visual or layout design of a level, you must consider how this level is aiding in the overall game mechanics as a whole. Go back and review the module on Player Experience and see how action theory, failure, frame, and purpose all play out here in specific levels.
Mike's article on intensity ramps is a fantastic description of the importance of knowing how to present challenges within a level and a game as a whole. Read it!
Finishing
And of course, what is any design worth than it being completed at some point.
Link to Finishing the Design
The big thing to remember when finishing a level design at this point, is what are your capabilities as a designer and what is the most efficient way for you to explore, iterate, and communicate your design. There very well may be client requirements as to what constitutes a finished design and that may be that you need to have a playable prototype of the level that can be play-tested. Or that may be (depending on the studio or customers) just a detailed map diagram and overview that will be provided to an art team for art development. No matter which way you end up the main point, is thorough thought and clarity in communication.
You might have a fantastic idea that looks absolutely stunning, but if it isn't communicated clearly, it is very likely to be misunderstood. And on the flip side, you might be the best communicator in the world, but if you have a lot of holes in your design or a missing a lot of pieces, then what you are communicating is bad... Gotta have both!
Player Guidance
I've said it a million, maybe even a kagillion times now... games are created inside of the players, not by game designers. Game designers do a lot to make the possibility of gameplay a reality, but it's not until players start playing that all the elements actually come together to make a game.
Furthermore whether your players actually understand how to play, want to play, or have fun playing is the ultimate goal for any game designer to work toward. Play-testing is the main feedback mechanism we have learned to explore the reality of the hopes to these questions, but how do we get there?
Looking back at our previous 7 modules you as a game designer have to know the kind of play you are creating, know what game elements are required to achieve the kind of play, know what systems are required to connect the dots, utilize the design tools you have to create the play experience inside the player, and do so in a way that is clear and hopefully consistent across most of your players.
No big deal right?
Player guidance is all about giving your player the kinds of queues they need to navigate your level successfully with the right levels of failure, success, challenge, and reward that helps them progress along the intensity curves, narrative, and overall goals of the game.
Player guidance should be as organic as possible within the context of your game and should utilize more than a single sensory queue to represent it. An example could be consistent visual iconography that helps the player know they can touch something, open something, or hit something coupled with audio queues that follow for successful interaction. Text base instructions are great, but they can break the fourth wall of game-play depending on your game design and approach. There no official right way to guide your players. But there is a wrong way, and that is that players get lost, frustrated, and stop playing.
Game Over!
A great example of organic player guidance can be found not in a game itself, but in a movie about games. I love this sequence from the Disney Movie "Wreck-it Ralph." If you haven't experienced arcade games like this, you definitely can get a feel for it by watching this clip.
One of the big constraints for arcade games in regards to player guidance is time. Arcades are designed to create play that generates lots of play starts. Each play start requires some amount of money to be paid. The game doesn't know if it is your first time playing the game, or if you have played it a hundred times before. Long narrative instructions and slow-moving mechanics require more time, which means less "new" plays being started. You have to get the player in the gameplay and engaged very quickly and it's best if you introduce enough mechanics very quickly and give the player quick wins to ensure they become hooked and want to return. The clip above from Wreck-it Ralph illustrates that guidance of the player perfectly with Calhoun's instructions to the First Person Shooter as she introduces the goals, the challenges, and the specific enemies as they increase in intensity very quickly.
I'll leave you with what will likely the best example of the "why" and process behind player guidance provided by Mike in his "A Morality Tale" article on his website Chaotic Stupid.
Hit it with a Wrench!
Once again, thank you Mike Stout for sharing your knowledge and experience and for his Patreon's for making it possible.
Assignment
For this week's assignment you are going to be designing a new level for your favorite adventure game. I thought about providing you all with a specific game, but I figured it would be presumptuous that you would have played the game previously, or could do so if you haven't already. So go ahead and pick your own game.
Here are the steps and constraints for your assignment:
1 Choose an adventure game that is either first-person or third-person view.
2 Your requirement as a game designer is to design a new bonus level that can be unlocked by achieving a specific goal within the game that will reveal the origin story of one of the games main characters. This particular origin story should completely change your players impression of the character itself whether good or bad or sympathetic, or concerning. Keep it PG though :)
3 Work through the design process outlined in this module to lay out your level design. This must include the level outline, bubble diagram, rough sketches and final design.
4 Your final design needs to be a 2D illustration of your level design that closely mimics the example provided in Mike's tutorial.
5 In addition to the level design itself please also provide how you will use player guidance strategies in the level as well. You absolutely should take queues from how the rest of the game is design and what guidance strategies are already used in the game. If your level adds something new, explain how you will guide your player through it.
6 Your final submission must include each of the parts of the design process including text outline, bubble diagram, rough sketches, and final design.
7
Submission: Once complete please save the Word Document with a file name matching this format. Replace 'Lastname-Firstname' with your actual name.
'Lastname-Firstname'_Assignment8.docx
(Example: Swardson-Brad_Assignment8.docx)
8 Click on Assignment 8 in the UNM Canvas Assignments Listing.
9 Scroll down to Assignment Files and Browse Local file to select the file you created and attach it to your submission for this assignment.
Please make sure you also complete the other requirements in your todo list like discussion post and quiz. Don't forget those.
-
Instruction
Review Module Written & Video Material