Week 2 - Solar System Tutorial
Overview
In this tutorial we are going to skim the surface of each of the main areas of creating a full shot in Maya. The reason for this is to familiarize you with the processess and instroduce you to how they all fit together.
We will cover the process of creating and naming objects (primitives) as well as organizing objects into basic hierarchical relationships with groups and pivot point manipulation. We will cover the basic concepts of animation using key frames on the timeline. In addition we will learn how to apply basic color to our objects and finally render out our entire animation and compile it into a movie file.
This may seem like a lot to cover in the first assignment, but don't worry. While the coverage is broad the concepts should be both simple to understand and execute. Let's get to it.
Project & File Management
Maya is a complex program that can involve many different files working together to produce the final output. These files could include scene files, file texture images, render cache files and many more. All of these files ARE NOT saved into your scene files when you choose Save Scene from the Maya File menu. So what is one to do?
Proper project and file management in Maya is handled by creating a project directory and making sure you set that directory when you open maya to work on a project. Let's go through that process now.
You can also watch this tutorial video on overall Maya Project Management for a different primer on this subject before moving on.
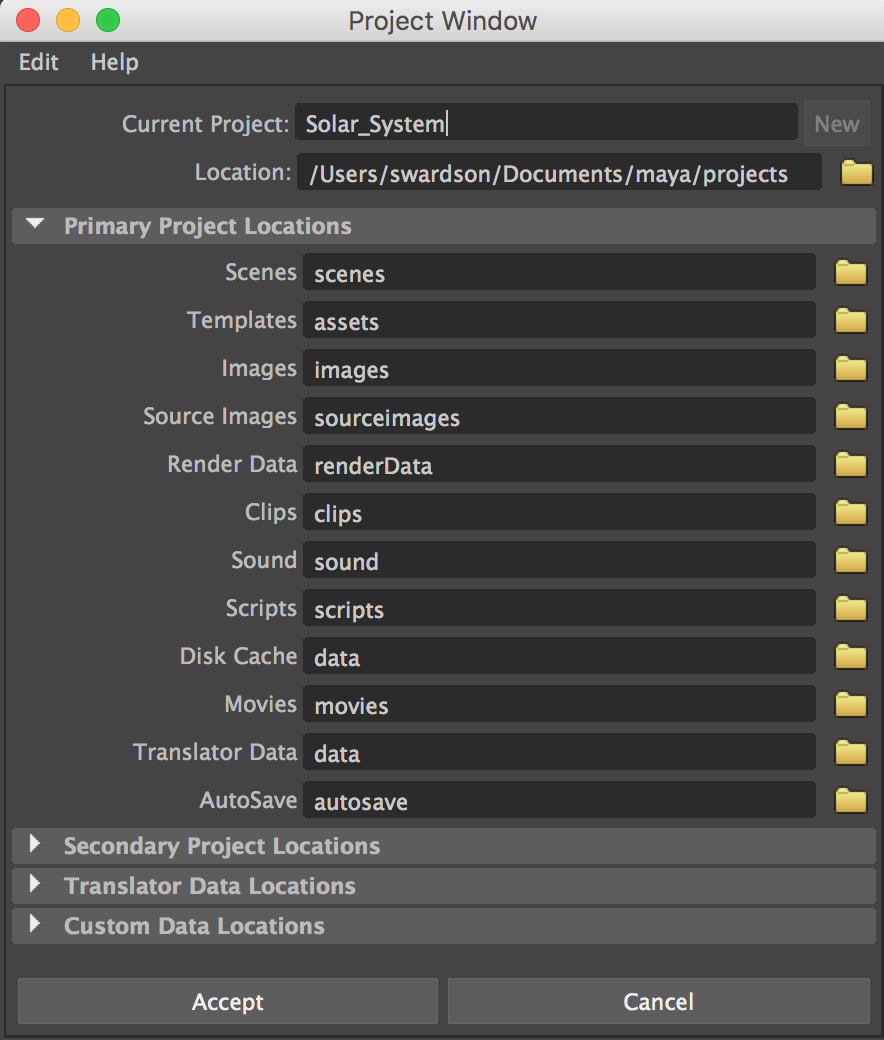
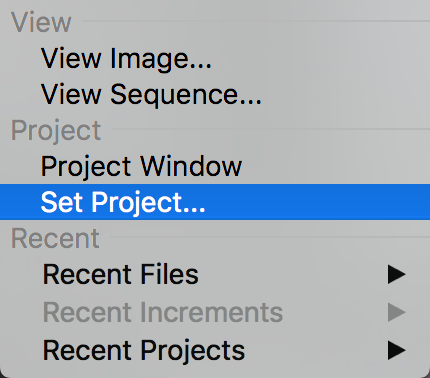
1 From the File menu choose Project Window
This will open up the Maya Project Window as seen in the following image:
2 To create a new project click on the New button in the top right of the window.
3 Enter the name of your project "Solar_System" in the newly editable field labeled "Current Project".
If you want to change the location of where on your computer you want to create this project directory click the folder icon below the new button and choose that location using the standard computer browser that pops up.
4 Once you have given your project a name and location click the Accept button at the bottom. Maya will then create this project directory and set its internal environment to this project moving forward until you exit maya or change it.
The location in which you create your project can be the local hard drive or an external drive or thumb drive. You can also move this project directory later if you need to.
Each time you open Maya to work on a project it is a good idea to get into the habbit of setting your project before opening a scene file.
5 When you open Maya first go to the File menu choose Set Project
6 Using the computers file browser that pops up navigate to the folder that is your project directory wherever it resides.
7 Select the project folder and then click the Set button.
Following this process at the beginning of each working session will go a long way in minimizing issues as you work on more complex projects in the future.
After you have created your new project or set an existing project you are now free to create new scenes and save scenes correctly.
Object Placement & Naming
First thing we are going to do is create the sun.
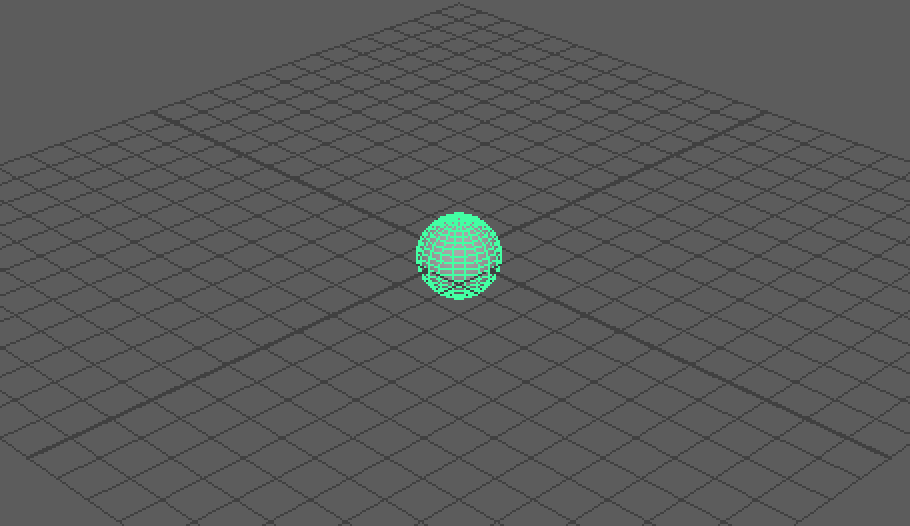
1 Click on the Create menu at the top of your maya interface, hover over Polygon Primitives and then select Sphere.

You should see a polygon sphere in the center of your grid.
If your sphere looks see through then you are in wireframe mode. If your sphere looks solid gray then you are in smooth shade. You can switch between these modes by tapping 4,5,6 and 7 on your keyboard.
4 = wireframe, 5 = smooth shade, 6 = textured, 7 = lighting.
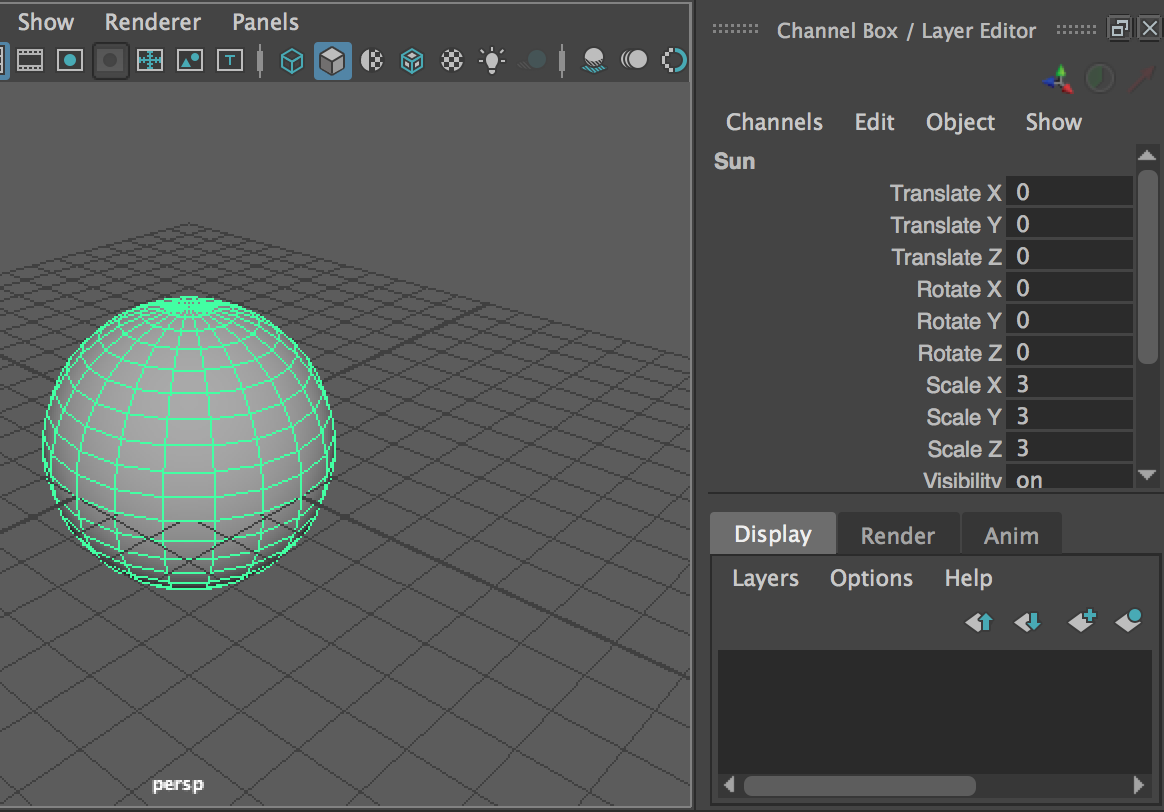
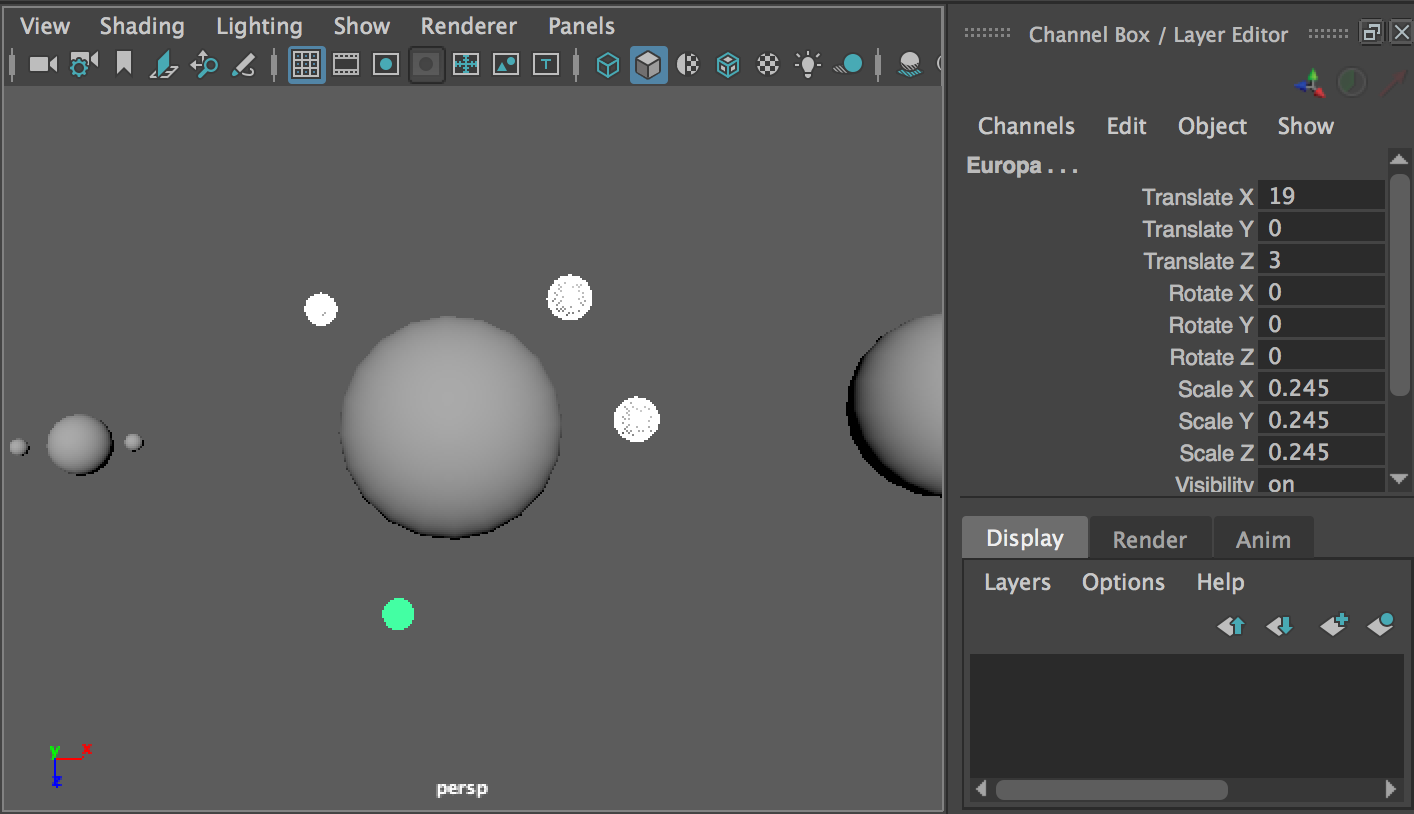
Next we need to name the sphere to "Sun" and scale it up to its needed size.
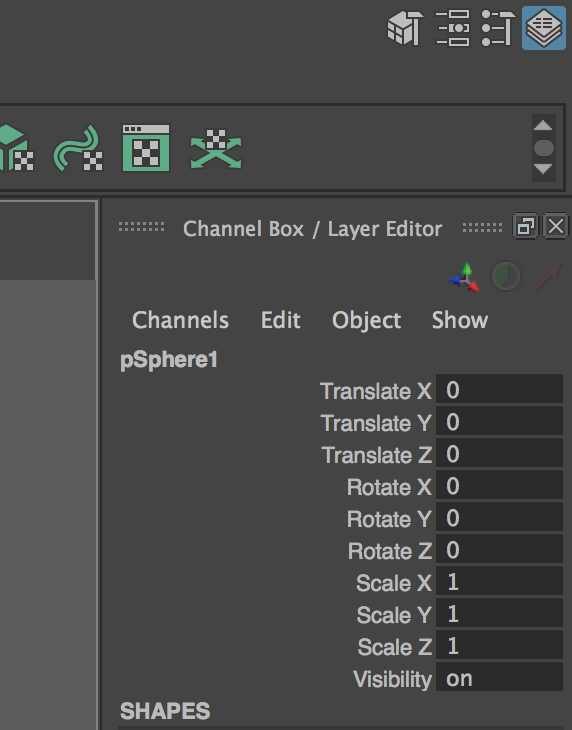
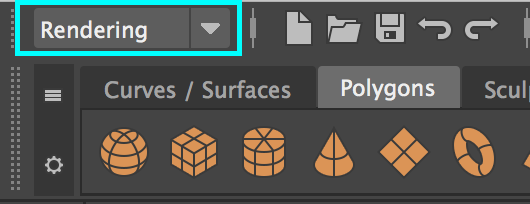
2 On the right side of your screen you will find the channel box. As long as your sphere is selected (select it if it isn't) you should see a series of labels and numbers like Translate X,Y,Z, Rotate X,Y,Z, etc. If you do not see this box make sure the set of 4 buttons like the image.
3 In the channel box where you see pSphere1. Click this field which will highlight the current name and will enable us to rename the sphere.
4 Rename the sphere to Sun.
5 Next enter the number 3 into each of the fields next to Scale X, Scale Y and Scale Z.
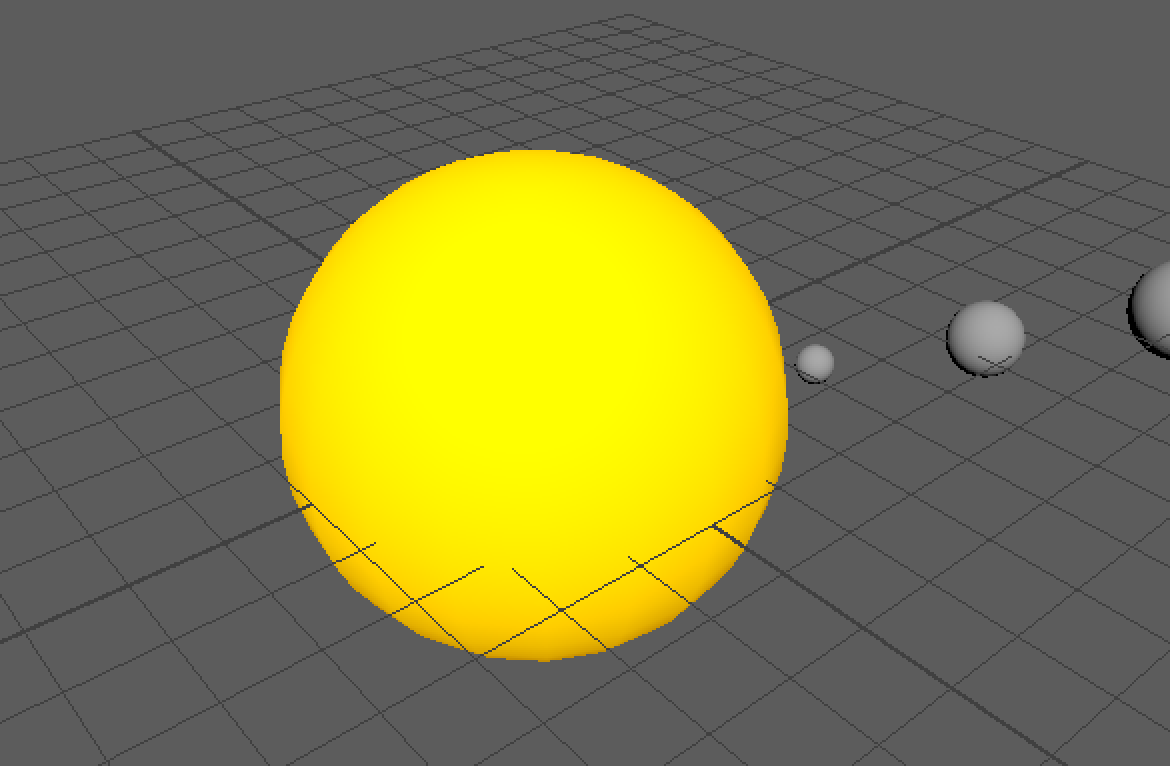
You should have a sphere and channel box that look like the following image:
Now we are going to create the first planet in the solar system.
6 Just like you did in step 1 of this tutorial create another polygon sphere. This new sphere is likely going to not appear once created because it is inside the larger Sun sphere. Don't Panic! :)
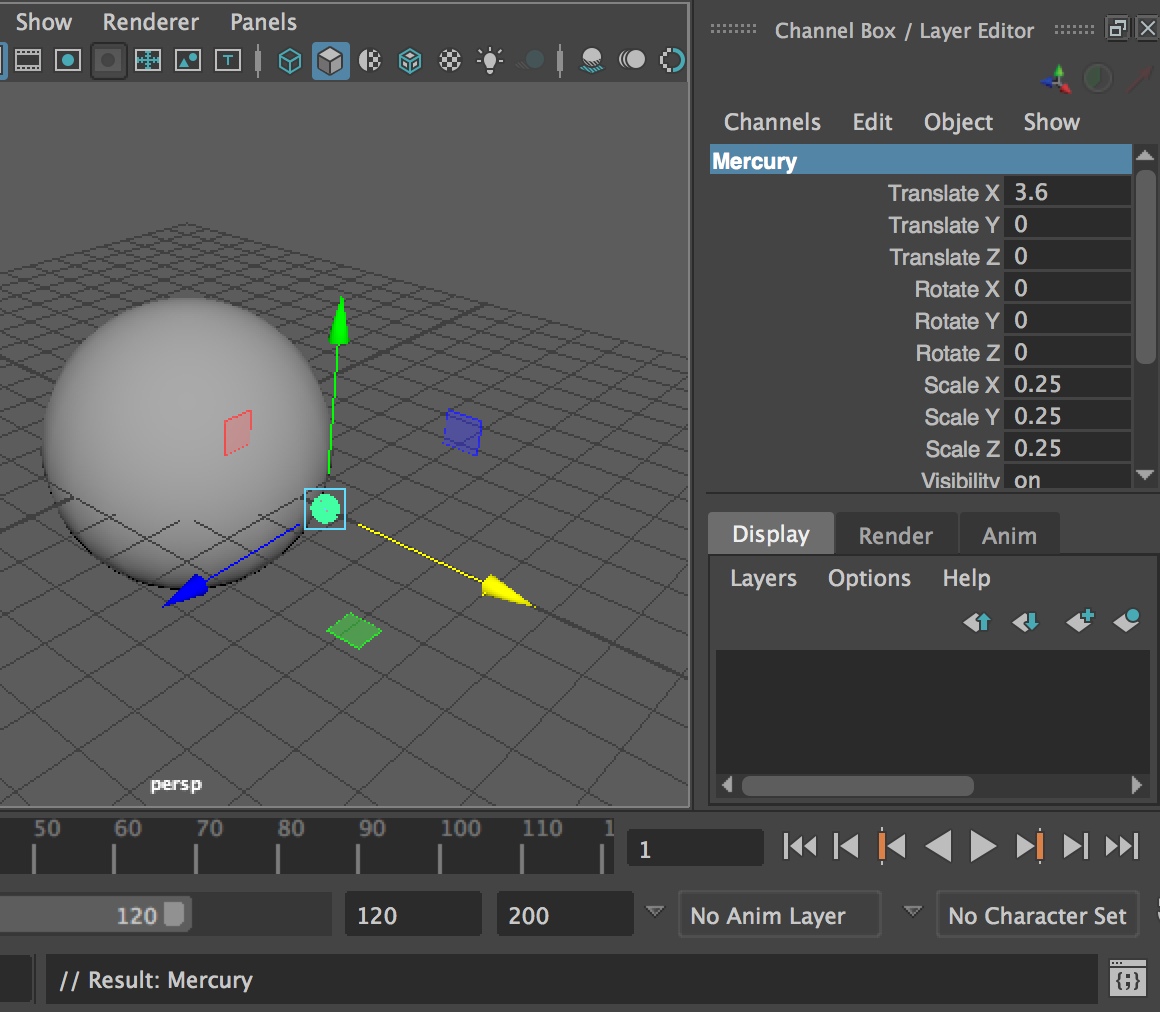
7 In the channel box rename this sphere to Mercury. Set the Translate X attribute to 3.6 and the all of the Scale X, Y and Z attributes to 0.25
- Edit > Undo (or Z on the keyboard) until it is reselected
- Open the Outliner (Window > Outliner) and select the sphere in the list of objects in your scene
- Use your camera controls (Alt + Left Mouse Button, Middle Mouse Button and Right Mouse Button) to move your view inside the sun so you can see the new sphere and reselect it.
Another way to go about creating a planet is by duplicating an existing planet and using it as a start rather than creating a whole new sphere.
8 Select your "Mercury" sphere.
9 Go to the Edit Menu and choose Duplicate. You can also use the hotkey of (control + d, cmd + d on Mac)
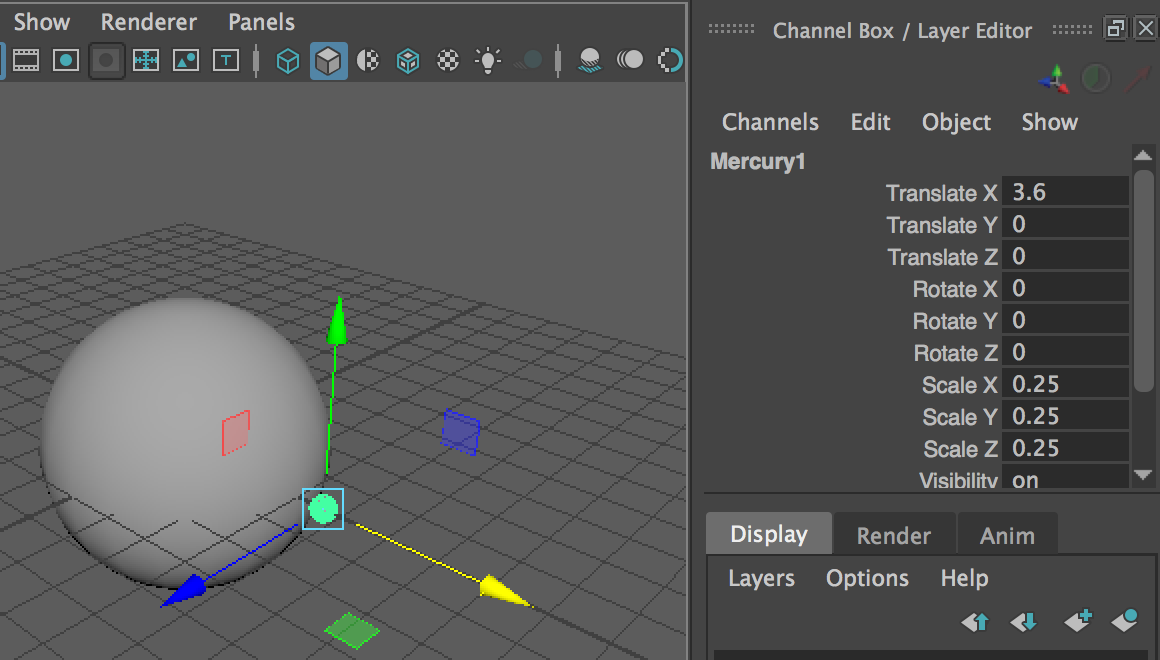
Once duplicated you will now have another sphere right on top of your first Mercury sphere and it will be named "Mercury1"
10 In the channel box rename your new Mercury1 sphere to Venus and set its Translate X attribute to 6 and its Scale X, Y and Z attributes to 0.5
Look at that! You have now created 2 planets and a star. At this point you owe yourself a pat on the back and a high five for your neighbor.

Go to the File menu and choose Save Scene As. If you have previously saved your file and already have a numbering sequence going simply increase the number by one. Example: Your previous file was named "Solar_System_01" so you should save this file "Solar_System_02".
This naming convention is not required, but is a highly recomended one. Whatever you do save often and save in versions.
At this point you have the tools and experience to create and position the rest of the planets in your solar system. You can use either the create polygon sphere method or the duplicate method it is up to you.
| Planet Name | Translate X Value | Scale X,Y and Z Value |
|---|---|---|
| Earth | 9 | 0.7 |
| Mars | 14 | 0.5 |
| Jupiter | 20 | 1.8 |
| Saturn | 28 | 1.5 |
| Uranus | 34 | 1.2 |
| Neptune | 40 | 1 |
| Pluto | 46 | 0.25 |
You can find these options in the panels > layouts menu above each of the viewport menus. You can use different layouts for different workflow optimizations. but it is completely subjective.
Now that we have our planets we need to add a few touches to them including moons and saturns ring. Let's get started with a moon for Earth.
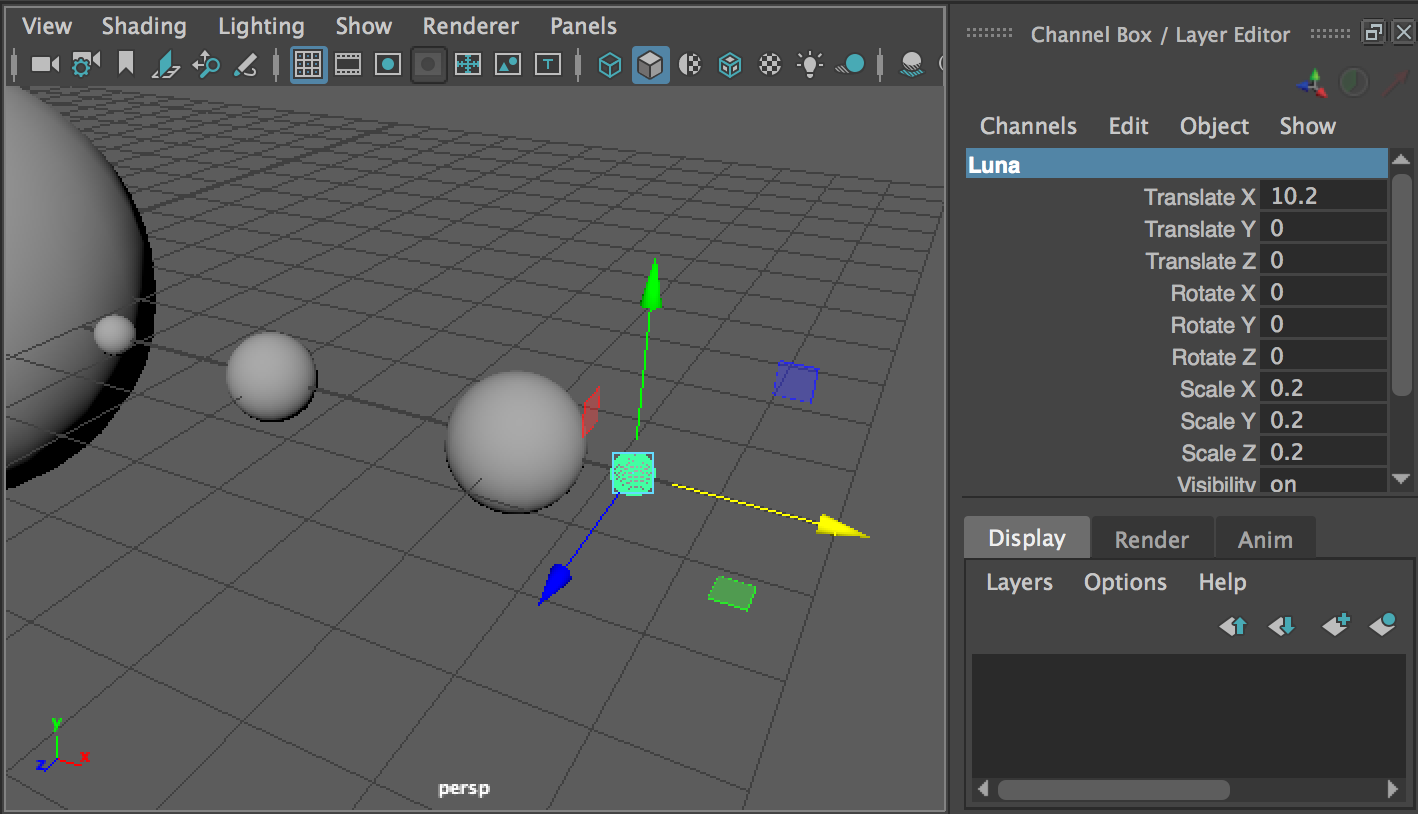
12 Select Earth and duplicate it.
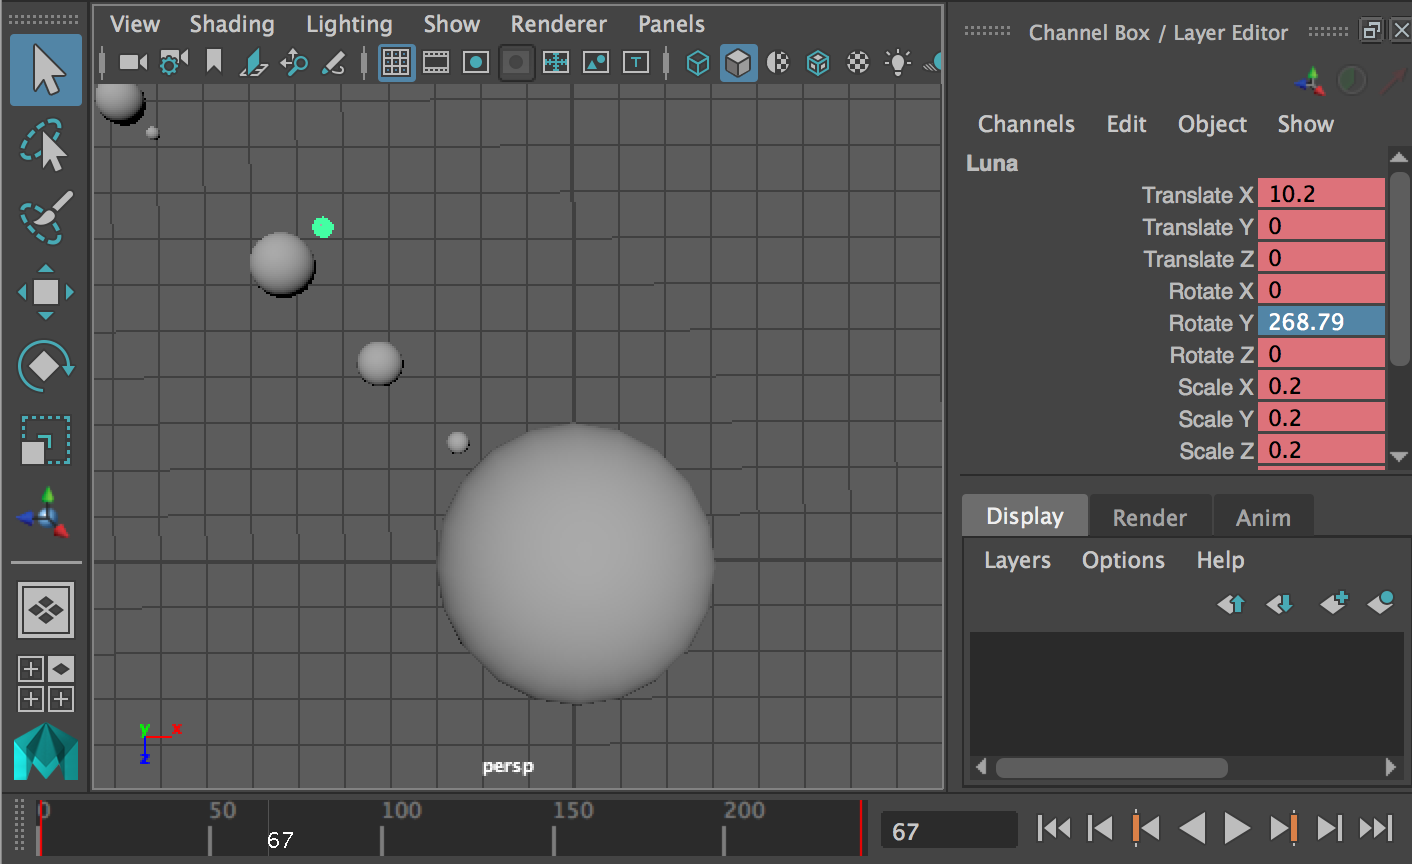
13 Rename it to Luna If you didn't know that was our moons name now you do :)
14 Using the move tool move Luna in the translate X direction (red arrow on the move tool) out a bit and scale it down to look like the picture. (~10.25 for Translate X and ~0.2 for Scale)
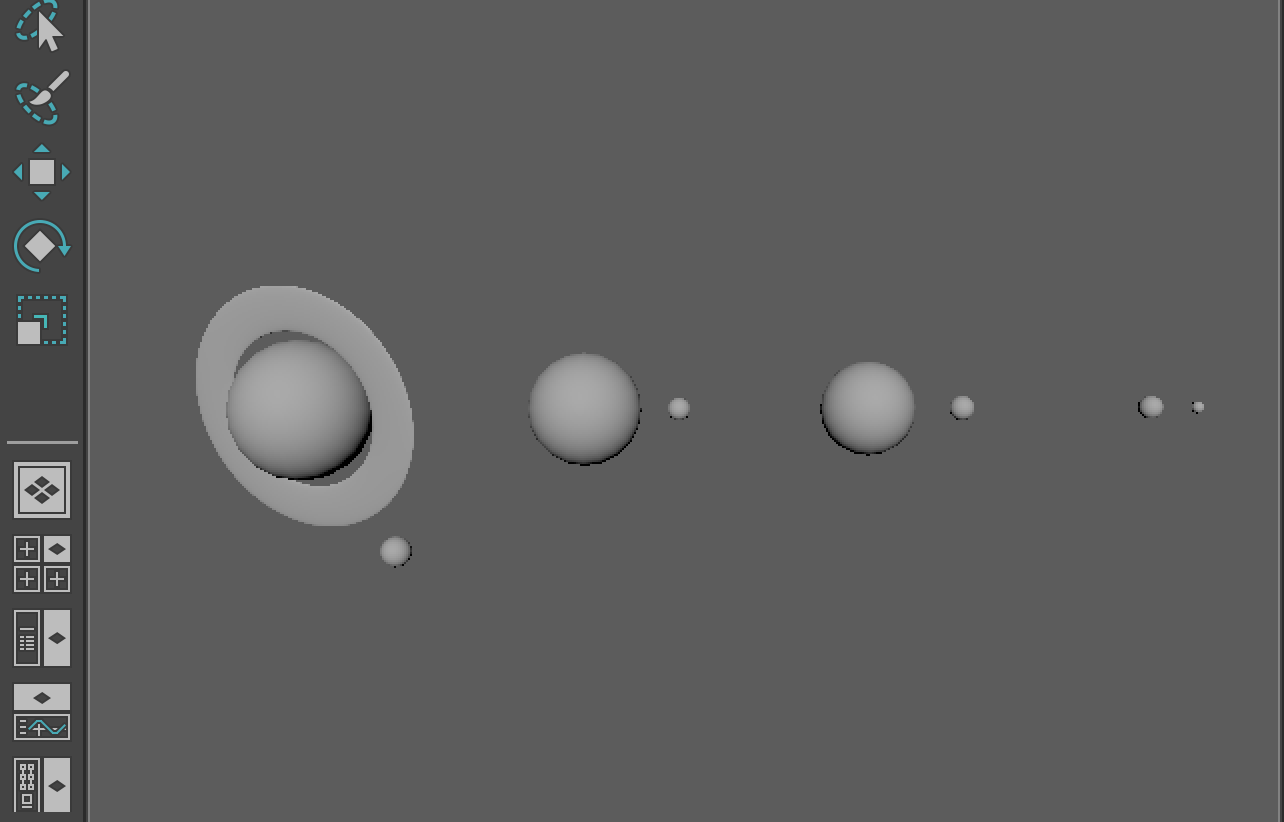
Now we are going to use the same process to create Mars' moons. Mars has 2 moons so we are going to create one on its Earth side and one on its Jupiter side.
15 Select Mars and duplicate it.
16 Rename it to "Deimos" and move it toward the Earth a bit and scale it down.
17 Duplicate either Mars or your Diemos moon. Rename it to Phobos, move and scale it to the jupiter side of Mars. Your picture should look something like the following:

In the same way that we aren't being physically accurate with the scale and positions of our planets we are not going to create all of the moons in our solar system. Juputer has 67. I know Right?!?! We do however want to create some of the moons for our planets and even place them around our planets in an interesting way.
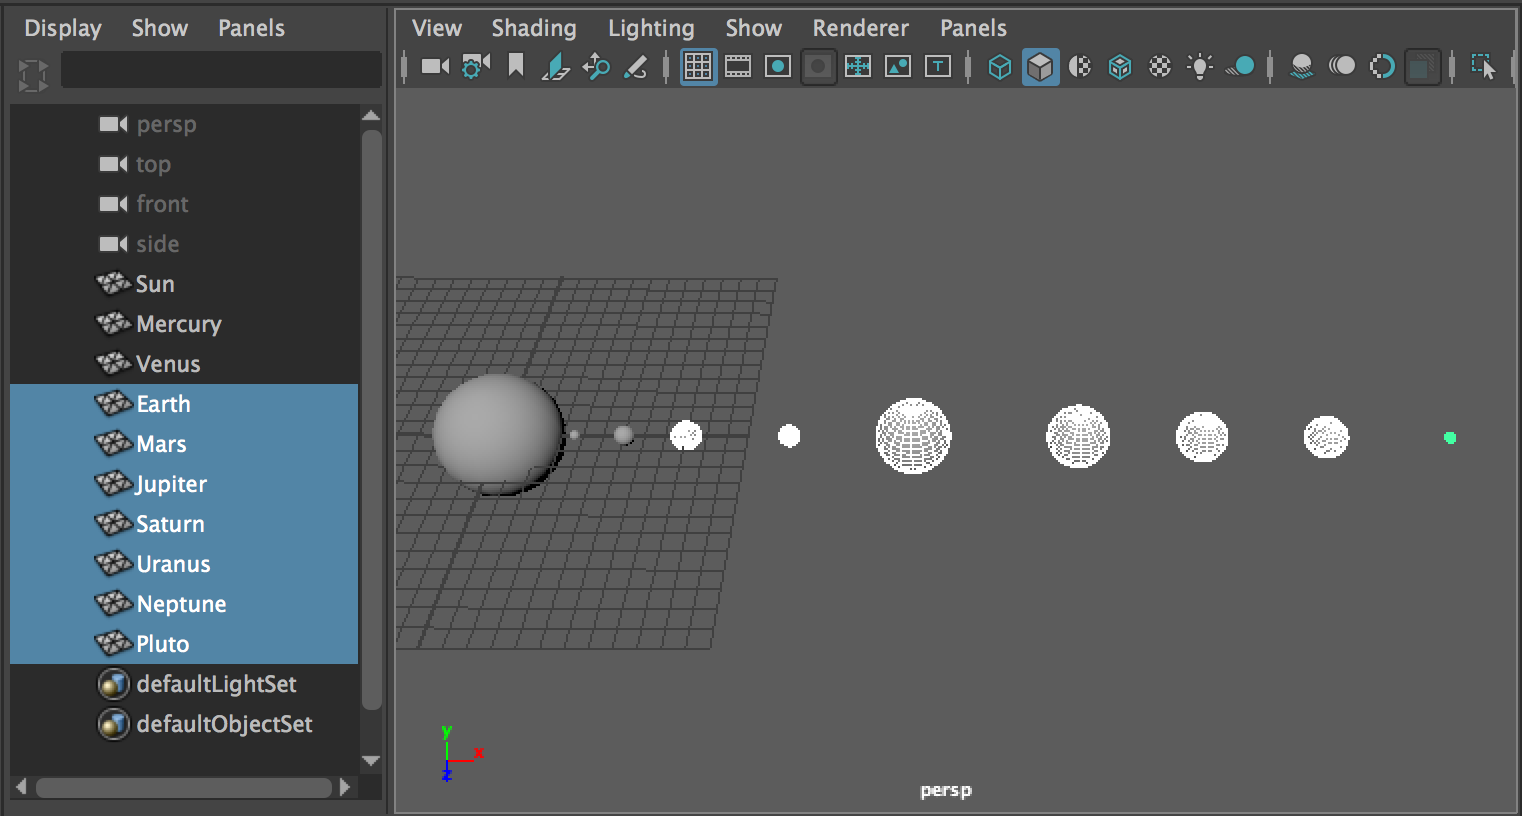
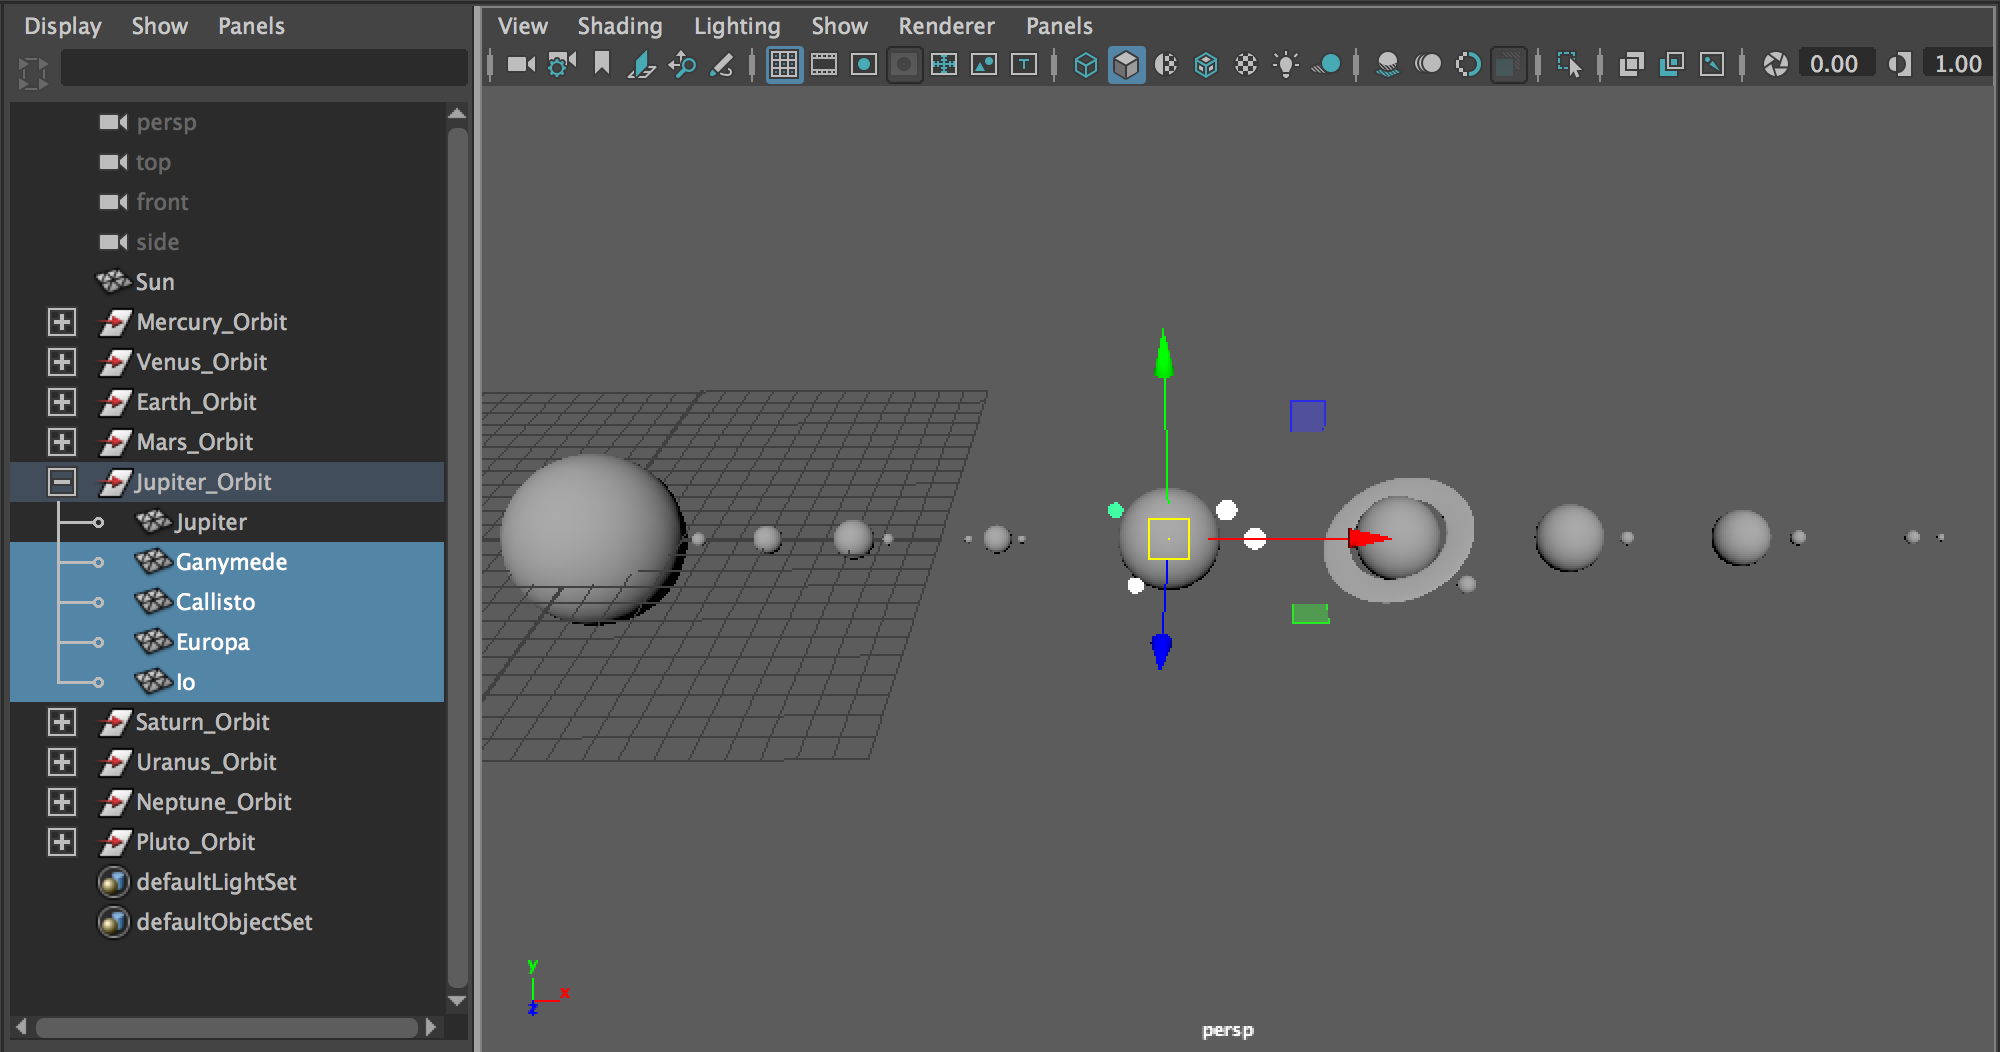
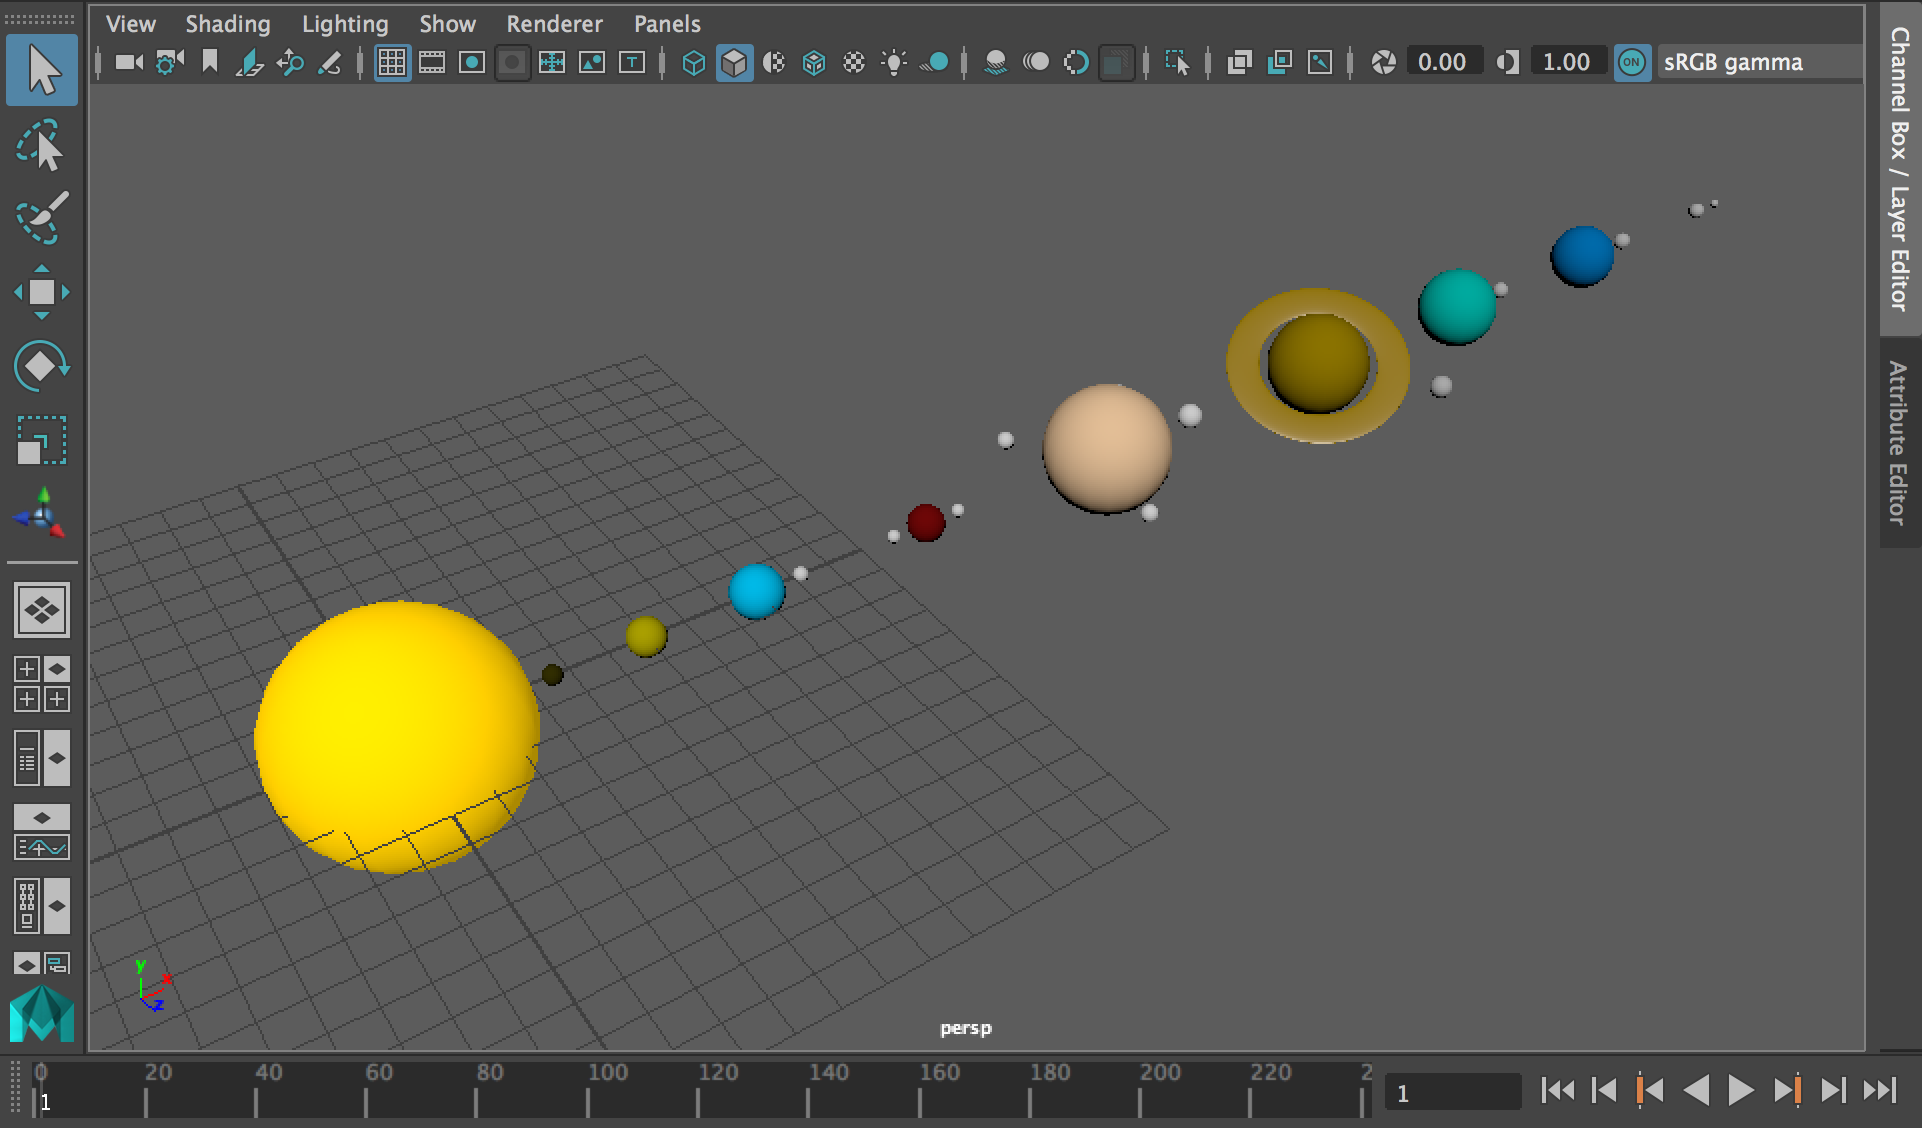
18 Let's create 4 moons for jupiter named Callisto, Io, Ganymede and Europa. Move and scale them to look roughly like the following image:
Before we create Saturn's moon we are going to create its ring.
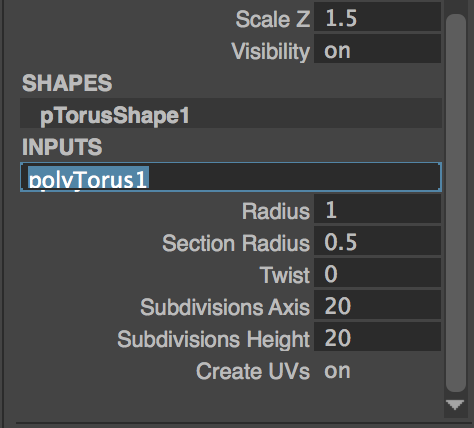
19 Go to the Create menu and hover over Polygon Primitives and choose Torus from the dropdown.
20 Rename the torus to SaturnRing and set the Translate X attribute to 28 and its Scale X, Y and Z to 1.5
Next lets flatten the torus so that it isn't so much like a doughnut.
21 Only Set the Scale Y attribute to 0.1

When you create a polygon primitive there are other attributes that describe the shape of the object than just the transformation attributes. There is a special node attached to primitive objects that is called the creation (or history) node and it has special properties that you can change to adjust the shape of the primitive. Right now our torus looks more like a saucer than a ring so we need to make some changes.
22 With the torus selected look in the channel box below the visiblity attribute. You should a couple of headers including SHAPES and INPUTS. Below inputs you should see polyTorus1. Click on polyTorus1 and it will reveal the creation attributes for our torus.
23 Change the Radius attribute to 1.4 and the Section Radius attribute to 0.3
Now the ring looks like a ring! One ring to rule them... Wait, wrong movie.
Before we move back onto our moons let's give our ring a bit more pizzazz to our ring.
24 Set the Rotate X and Z to 20 Oooooh! Pizzazz!
- You can use an underscore "_" in place of a space. Ex: Solar_System
- There is camel case which capitolizes the first letter of every word. Ex: SolarSystem
- There is also mountain naming which capitolizes the first letter of every word except for the first word. Ex: solarSystem.

Back to our moons.
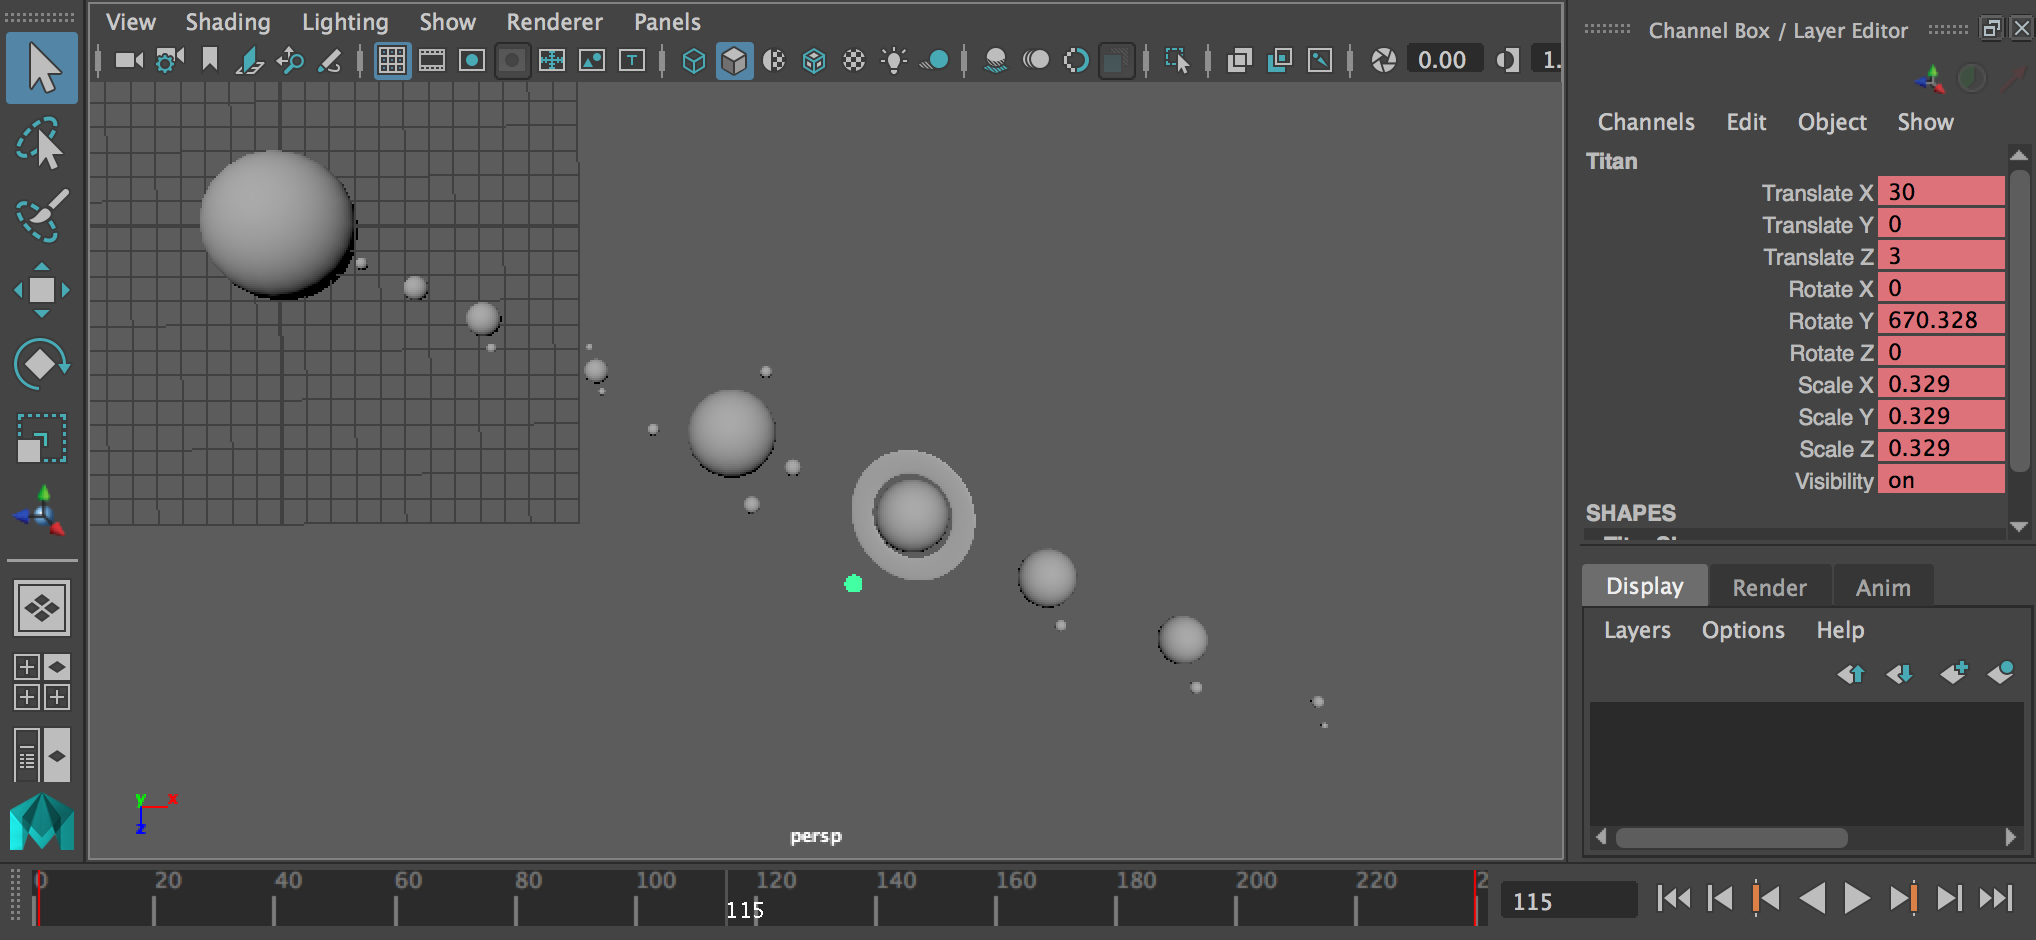
25 Create a moon for Saturn and name it Titan
25 Create a moon for Uranus and name it Oberon
26 Create a moon for Neptune and name it Triton
27 Create a moon for Pluto and name it Nix
At this point you have completed the first stage of creating the solar system which is "object placement and naming."
Great job!

Hierarchy & Pivot Points
Now that we have all of our objects we have to prepare them for animation. Sometimes objects can simply be animated as they are, but more often then not you need to think about organizing your objects into hierarchical relationships and/or moving their pivot points to allow for an easier time of animation. This stage of the process is called animation prep, or better yet rigging even if it is simple.
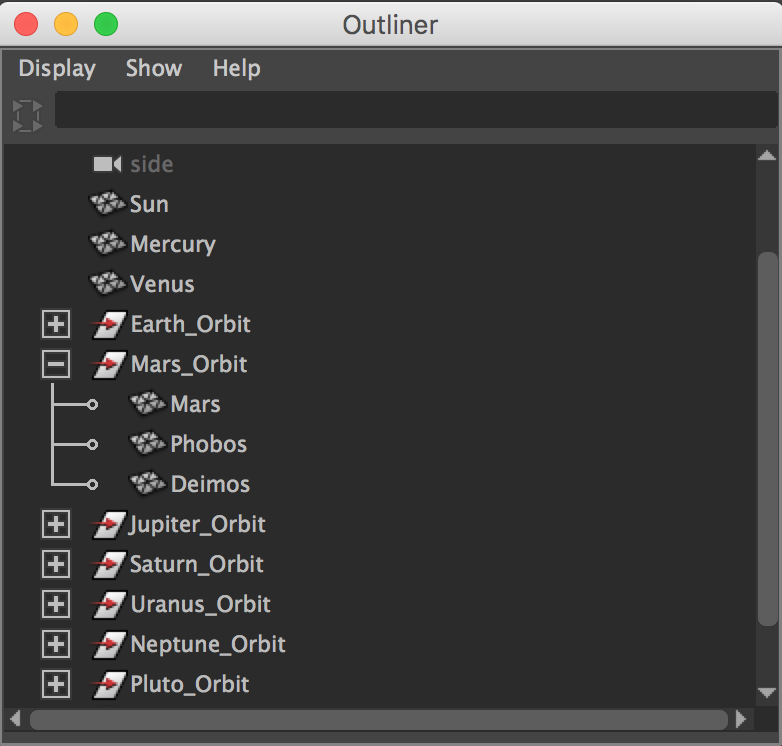
1 Open the outliner by going to the Windows menu and choosing Outliner
You will also notice 2 other objects at the very bottom of the outliner caled defaultLightSet and defaultObjectSet. These are utility objects that Maya uses to keep track of things. Just ignore these objects.
All of our objects right now do not have any relationship to one another other than they are all siblings of one another and children of nothing. Objects can however become related to one another in a hierarchical relationship (parent -> child) if we set them to be. We can also create special objects that act as containers for other objects. These are called group nodes. Over the next few steps we will create some of these relationships and then we will discuss why.

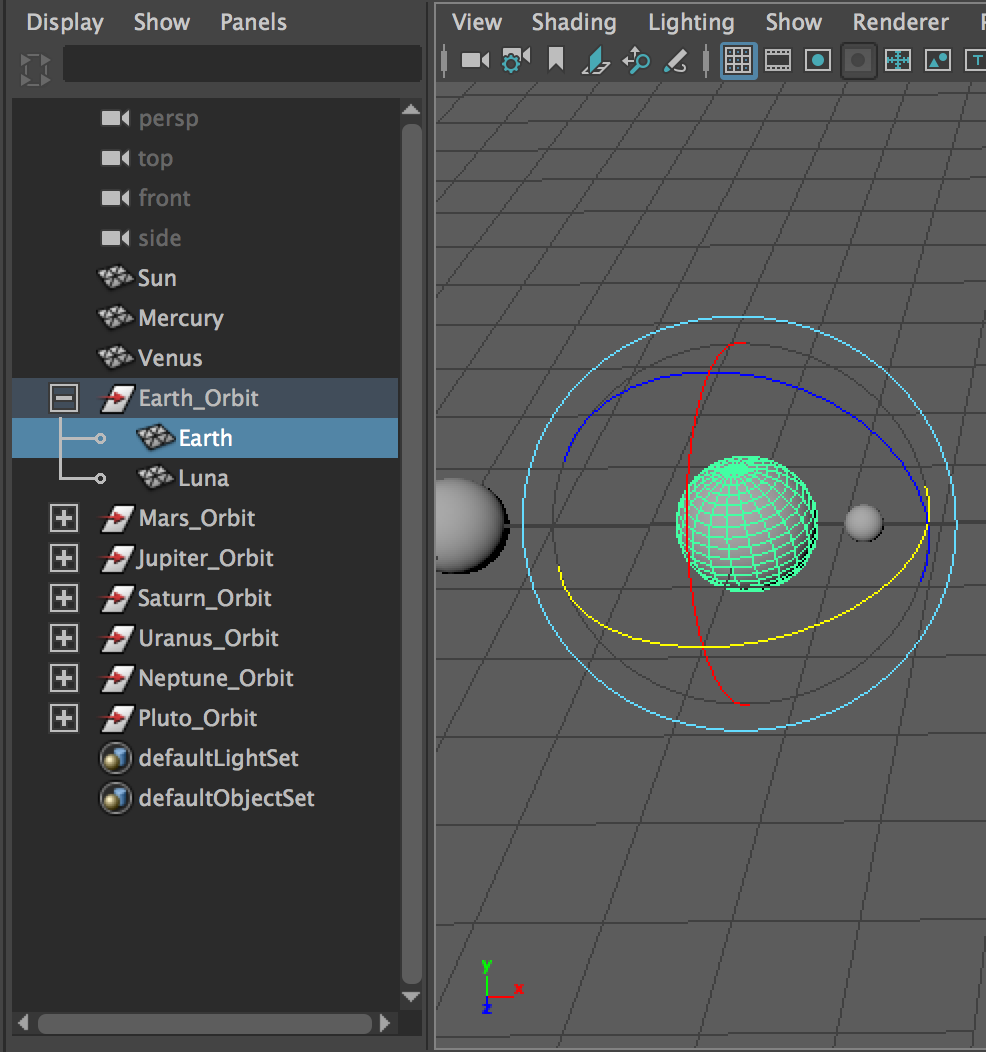
First we will create a group for Earth and Luna.
2 Select Earth in the Outliner. Then, while holding shift on the keyboard, select Luna.
3 Go to the Edit menu and select Group or control + g (cmd + g on Mac)
You should see both Earth and Luna disappear and a new object named group1 added to the bottom of the outliner that has a plus button next to it.
4 Click on the plus button next to group1
What you have done is create a new group node that contains both Earth and Luna as its children illustrated by the indented connecting lines when you clicked the plus button next to group1. This is how hierarchical relationships are shown in the outliner.
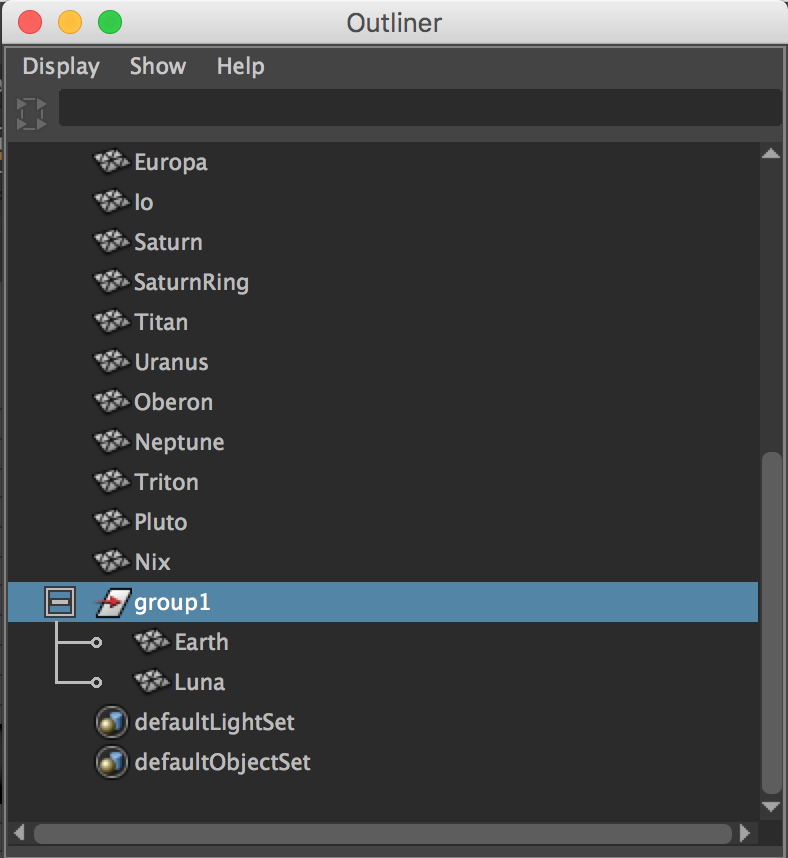
5 Double click on group1 in the outliner and it will allow you to rename the object. Rename it to Earth_Orbit

6 Follow steps 2-5 for each the other planets that have moons (or rings). Ensure that you select the planet and all of its moons (or rings) before running the group command. Name each group with the same naming convention as Earth (Mars_Orbit, Jupiter_Orbit, etc.)
Try it out and see how you can organize your objects in the outliner using the MMB drag approach.
Let's talk a little bit about why we are doing this because it is not just to make our outliner look nice. Though it is definitely much better on the eyes :)
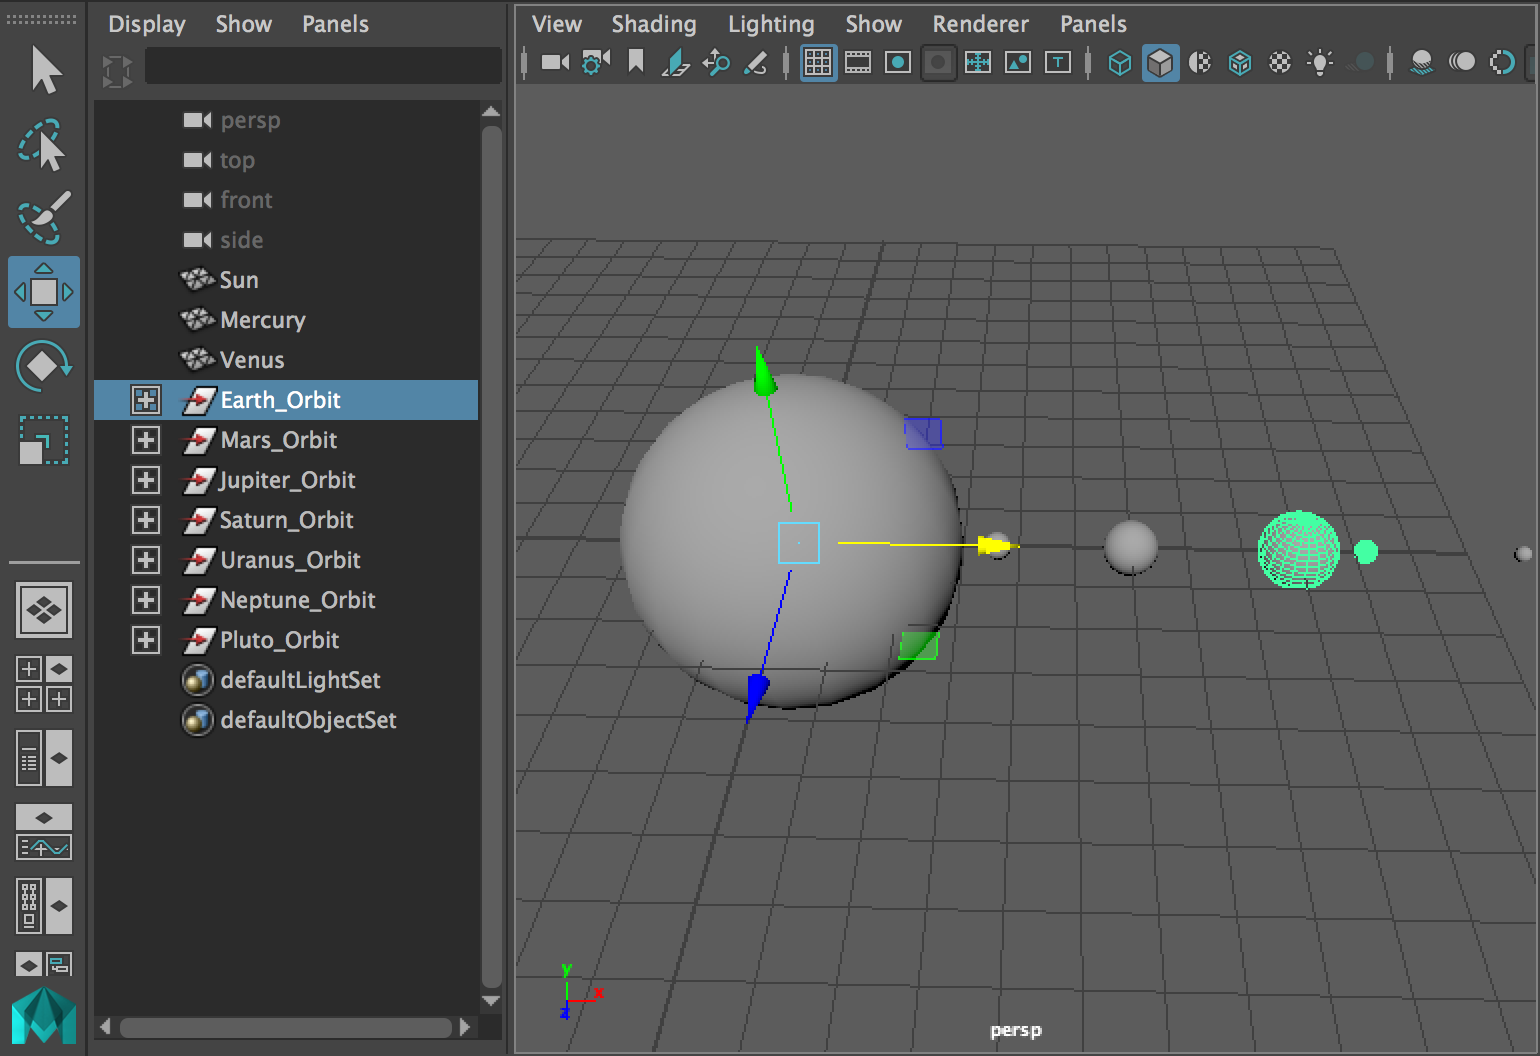
7 In the outliner select the Earth_Orbit object. In your perspective viewport back your camera out so that you can see at least the sun and the earth. Also activate the move tool in the toolbar if it isn't already active.
Interestingly the move tools manipulator handle is not in the center of the Earth or the Moon like it was before, but the Sun. In reality the sun has nothing to do with why this is. When you create a group node its center (also known as its pivot point) is placed at the center of the grid at (x=0, y=0, z=0). It just so happens that the sun is also at that central point. This will work out rather well for our setup becuase we want our planets to orbit around the sun. Let's do a little test to illustrate why this is beneficial.
Before we move on to continuing our setups we need to look at one more thing.
8 In the outliner click the plus button next to Earth_Orbit to show its children. Select the Earth object only.
Which object you select when objects are in hierarchical relationships matters. When you are moving, rotating or otherwise manipulating objects do not just assume you should select them in the viewport by drawing a box around them and then moving them. Doing so will move the child objects but the parent object will remain where it is. More often than not you will want to select the parent object which will in-turn move the children without having to explicitly select them.
Now that we have explored the benefit of creating the group nodes for our orbits we need to create the same for the rest of the planets that weren't before. Even though they don't have moons or rings they still need the group node with its pivot at the center of the sun for animation later. Let's do that real quick.
9 Select Mercury in the outliner and go to the Edit menu and select Group then rename the new group to Mercury_Orbit
10 Select Venus in the outliner and go to the Edit menu and select Group then rename the new group to Venus_Orbit

Now that we have our planet groups all setup we need to look at how we are going to setup our moons to be able to orbit around our planets. You didn't think you'd get off that easy did you?
We could follow the same process as the planets by creating a group for each moon or group of moons for our planets, but the center of say Luna isn't 0,0,0 of our world. It is whatever position the Earth is. While this still doesn't disqualify grouping there is a better way. This better way is manually chaning the location of the pivot points for our moons to be right where we want them.
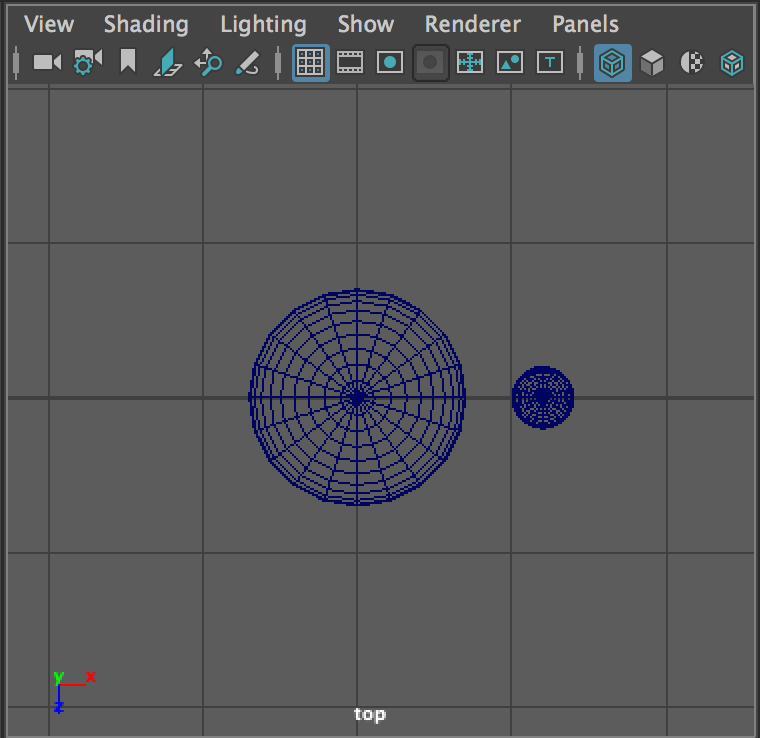
11 In your perspective viewport switch to the top orthographic view and frame your camera nicely over the Earth and Luna objects.
12 Select the Luna object in the viewport and activate the move tool.
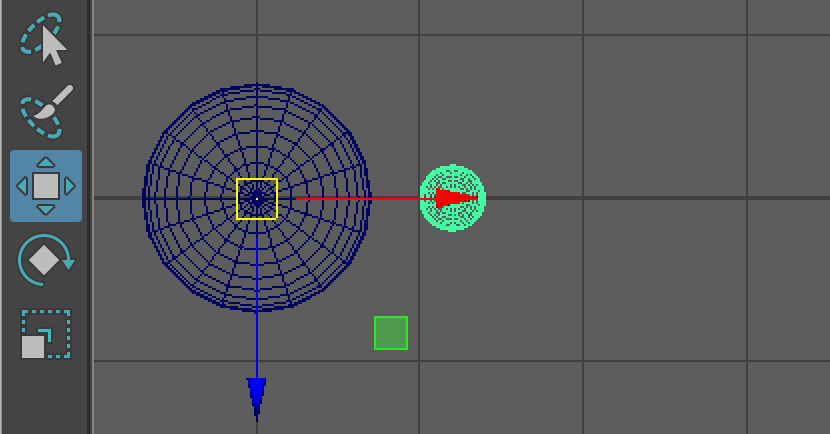
To move the pivot point rather than the object itself you need to activate the pivot point manipulator.
13 Press and hold the d key on the keyboard. You should see the manipulator change to include some rotation manipulators.
14 While holding the d key down click and drag on the yellow box that is around the center of the manipulator. This will allow for you to freely move the pivot point around.

This is great, but positioning the pivot point precicely at the center of the Earth isn't very accurate using this method. Let's add grid snapping to our process to remedy this precision issue.
15 While holding the d key down also press and hold the x key on the keyboard. Then once again click and drag on the yellow box that is around the center of the manipulator. This time the movement of the manipulator will snap to grid intersections. Drag the pivot point to the grid point that is at the center of the Earth and then release both the mouse button and keyboard keys.
You will now see the pivot point for Luna positioned directly in the center of the Earth. If you activate the rotate tool you can now rotate Luna around the Earth much like you could rotate the Earth_Orbit group around the sun before. Coll huh!
16 Work through these steps to move the pivot points for each of the moons to the center of their respective planets. Don't forget to use grid snapping (holding x on the keyboard) while positioning the points for ultimate precision.
At this point you have completed the second stage of creating the solar system which is "hierarchy and pivot points."
Seriously Awesome job!
Animation
Now that we have all of our objects and they are setup for animation its about time we get these planets moving. Before we get into the steps lets talk a little bit about what animation is.
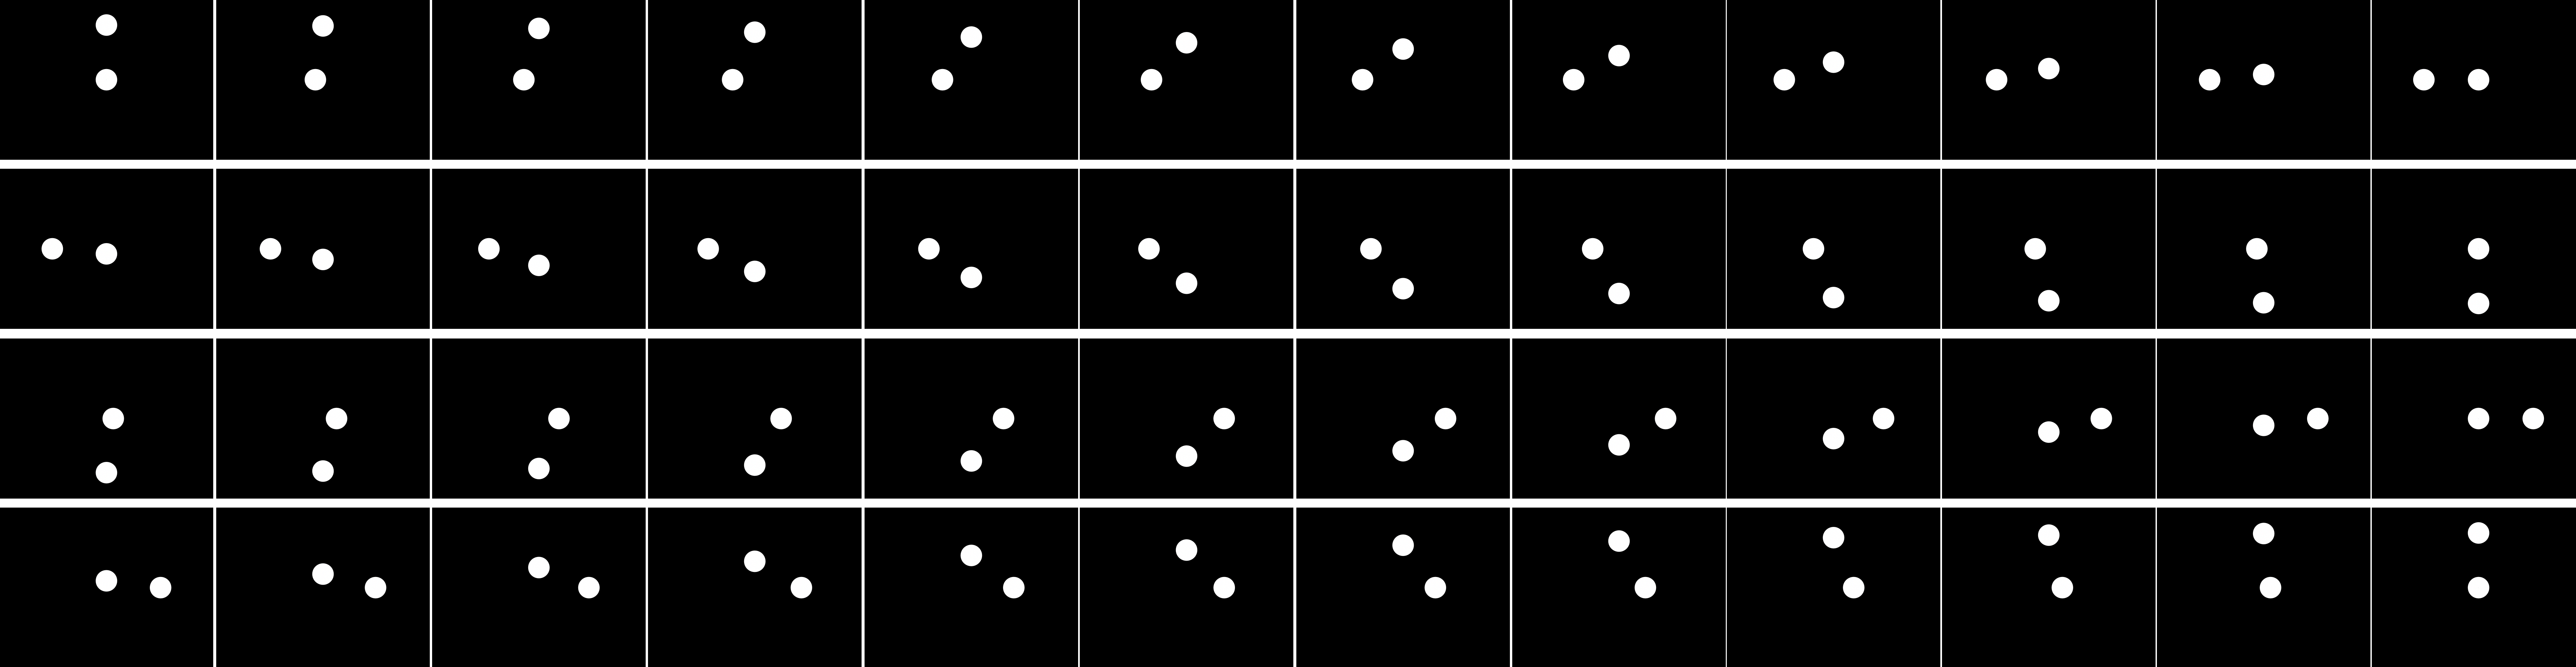
Animation is the illusion of motion created when single images, also known as frames, are played back in rapid succession anywhere from 12 to 24 times per second. If the frame images all show the exact same thing then whatever is on those frames will appear to not move. If there are slight variations in the content of the images than those variations will translate into motion as the images play back. The 6 examples below illustrate the difference between a still image and various frame rates ranging from 3 to 24 fps (frames per second) and finally one with motion blur added.


You should notice that while the illusion of motion is achieved as early as the 3 fps example it is very choppy and not necessarily clear what the exact motion is. As we progress up to 6, 12 and 24 fps the motion becomes smoother and clearer. The addition of the motion blur in the last image helps each make the animation less choppy. Below is what each of the 48 frames look like for our 2 second animation. The top row is frames 1-12, second row is 13-24, etc.
You will see across the bottom of your maya interface a set of sliders and numbers and some playback controls on the right. This whole section is the timeline and range slider and is used to facilitate our process of taking our static objects and creating an animation. Before we get to animation lets break down the pieces of the timeline to get acquainted with the terminology and their use.

- Timeslider - Depending on how many frames are shown you will see vertical lines for every frame, every other frame, every 5th frame or every 10th frame etc. This is the area where you will see your various keyframes that are set later. You can also click and drag on this slider to change the visible frame number.
- Current Frame Number - Change this value to change what current frame is being viewed.
- Playback Controls - Play, pause the playback of your animation as well as other controls for skipping forward or backward to the next frame, next key frame etc.
- Animation Start Frame - The frame number of the start of your entire animation sequence. Usually this is set to 1 or 0, but can really be anything.
- Playback Start Frame - The frame number of the start of the playback range. You can compress the playback range to focus your attention on certain areas of your overall animated sequence.
- Range Slider - Its width is represented by the start and end playback values. You can click+drag the left box to change the playback start and the right box to change the playback end. You can also drag the whole bar to adjust the section of playback you wish to view within the overall animation start and end frames. Changing the start and end playback range will adjust the viewable area in the timeslider.
- Playback End Frame - The frame number of the end of the playback range. You can compress the playback range to focus your attention on certain areas of your overall animated sequence.
- Animation End Frame - The frame number of the end of your entire animated sequence.
Okay, enough chatter. Let's get started shall we?
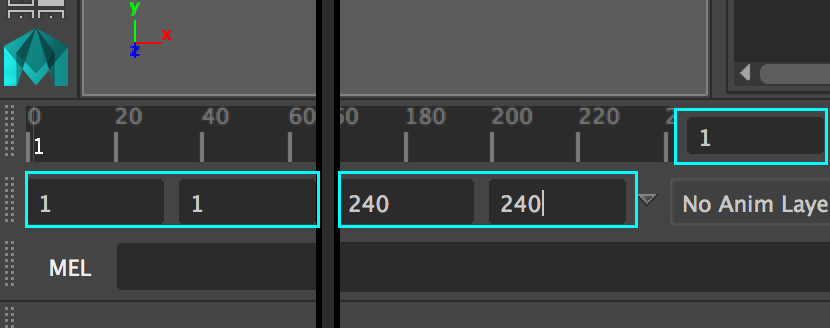
1 Change both the Animation Start Frame and Playback Start Frame fields to 1
2 Change both the Animation End Frame and Playback End Frame fields to 240
3 Change the Current Frame to 1
Before we start setting keyframes let's make sure our playback speed is correct.
4 Click on the Animation Settings button just below the playback controls.
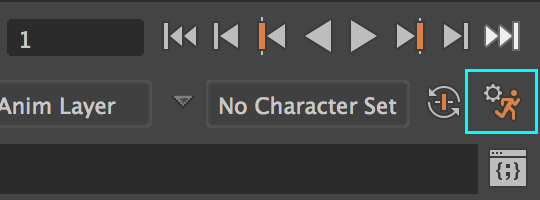
5 Under the plackback section look for the dropdown marked Playback speed: and change it to Real-time [24fps]
6 Click the save button.

Now it is finally time to start animating our planets. FINALLY!!!! We are going to start with the Earth.
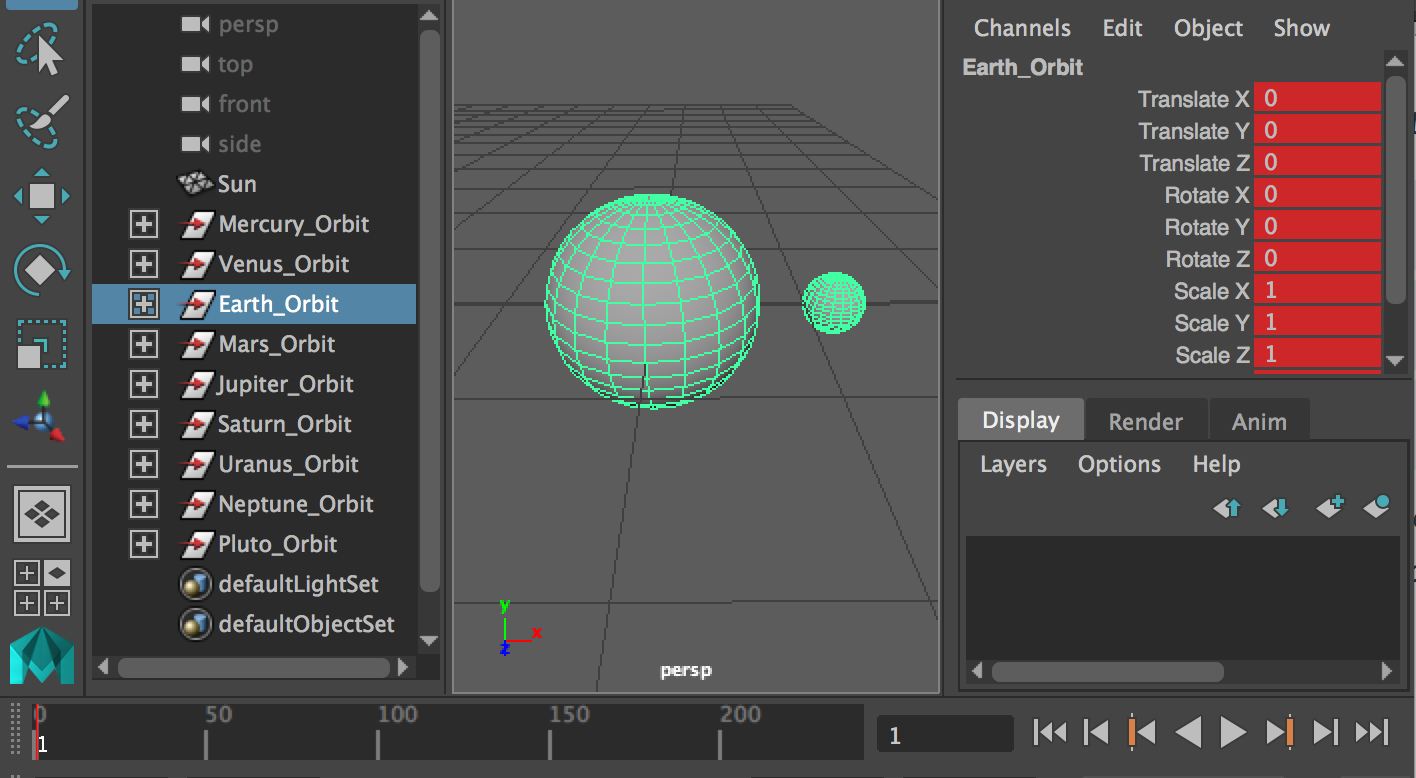
7 In your Outliner select the Earth_Orbit object
8 Ensure that your current frame is set to 1
9 Tap the s key on the keyboard to set a keyframe.
You will notice a few things change after hitting the s key. First you should notice a small red line show up on the timeline at frame 1. You should also notice that all of the transformation attributes in the channel box have turned red. This indicates that the current selected object has a keyframe set on it.
I am glad you asked :). A keyframe is a way for you to tell Maya that you want this object (the one or ones selected) to be right where they are at the specific time (frame) you set it. Think of keyframes as markers over the passage of time that tell your objects where you want them to be at given times. keyframes mark key moments in time for your objects.
When setting keyframes it is important to make sure you follow the order of the What -> When -> Where rule. First you should select the objects you will be working with. This is the "What.". Second you should change your timeslider to the frame at which your change will take affect. This is the "When." Lastly you then change the attributes of the selected objects however you need (tools, channelbox, etc.). This is the "Where." If you don't do it in this order you will find yourself having to redo things and who likes that?
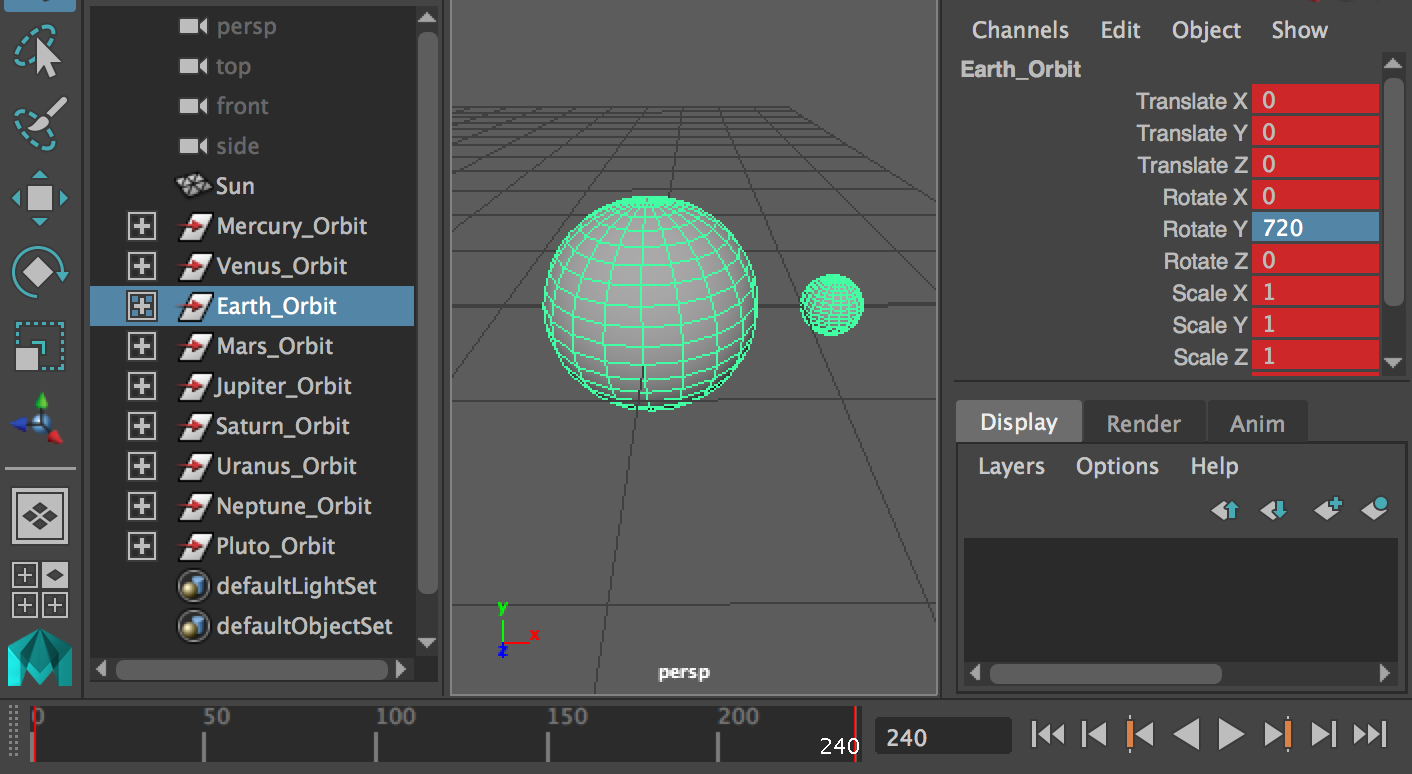
10 Ensure that Earth_Orbit is still selected
11 In the timeslider or current frame field change the Current Frame to 240
12 In the channel box change the Rotate Y attribute to 720
13 Tap the s key on the keyboard to set another keyframe.
If you back your camera out so you can see the whole solar system and click the play button in the playback controls you should see Earth and Luna orbiting the sun twice before your animation loops.
Remember how our pivot point for the Earth_Orbit group allowed us to use the rotate tool to rotate the earth around the sun? Well we used keyframes to tell Maya that at frame 1 we want the Rotate Y to be at 0 degress and at frame 240 we want the Rotate Y to be at 720 or 2 full rotations. 360 degrees is one full rotation so 360 x 2 = 720. Yay Math!
The cool thing that Maya does is it figures out what all of the inbetween values are between 0 and 720 and fills all of that information into our timeline for us rather than us having to go frame by frame and tell Maya what minor incremental motion to make. This is call interpolation or tweening. Cool huh?!? Let's do it agian!
Also worth noting is that the Earths moon "Luna" is orbiting around the sun along with the Earth. How can this be since we only animated the Earth? The reason is we didn't animate the Earth object, but the group node above it "Earth_Orbit." Had we selected just the earth object we not only would have only been moving that sole object, but we wouldn't have had our pivot point in the right area for the Rotate Y to work. By animating the group node that contains both the Earth and Luna objects, both our planet and moon will move together around the sun. It is also important to note that the fact that Luna doesn't have any keyframes yet will be imporant for our later animation of the moon around the planet.

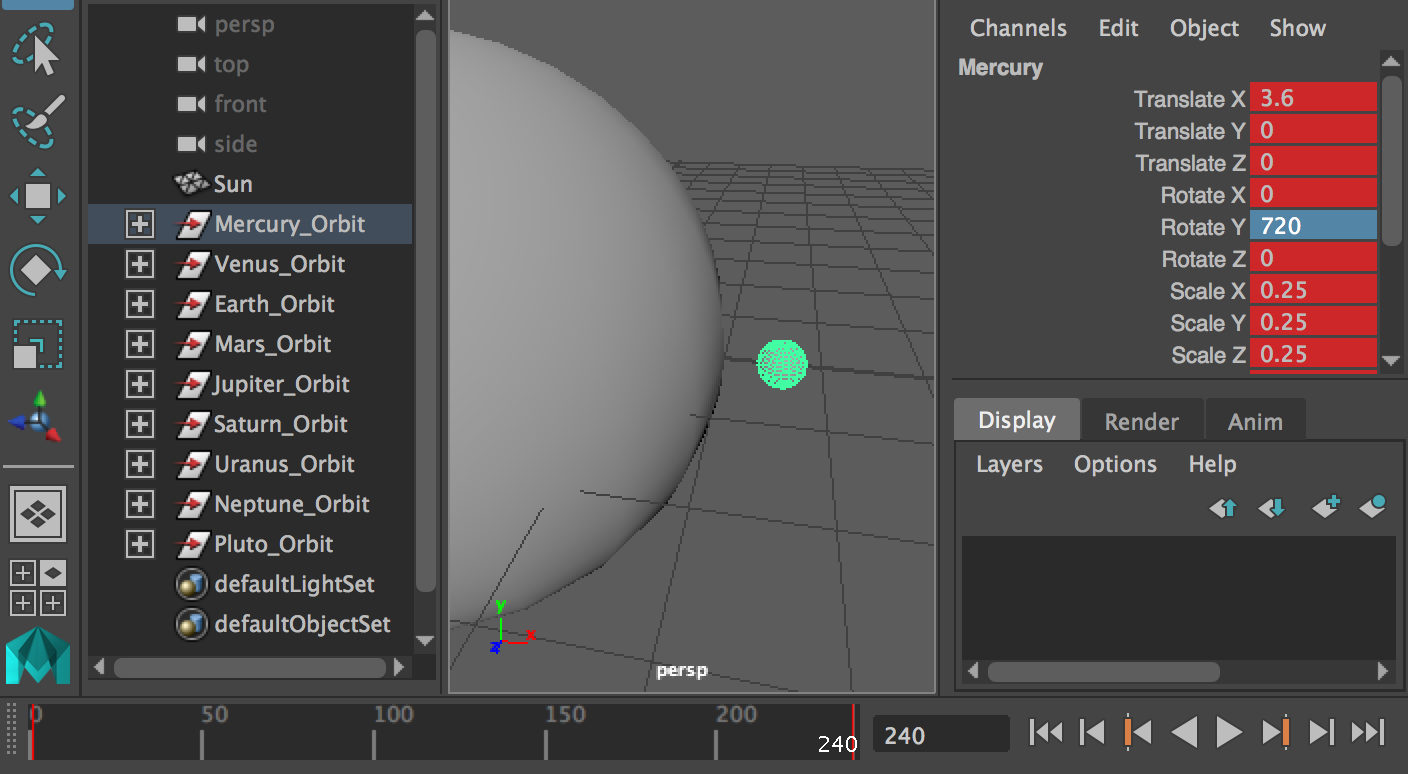
14 In your outliner select the Mercury_Orbit object
15 Ensure that your current frame is set to 1
16 Tap the s key on the keyboard to set a keyframe.
17 Now set your current frame to 240
18 In the channel box change the Rotate Y attribute to 720
19 Tap the s key on the keyboard to set another keyframe.
- Venus_Orbit
- Mars_Orbit
- Jupiter_Orbit
- Saturn_Orbit
- Uranus_Orbit
- Neptune_Orbit
- Pluto_Orbit
Bonus points for those who realize they can control select multiple groups in the outliner and can set keyframes for all of them at the same time.
Now that all of our planets orbits have been animated we need to move on to animating the moons orbits around each of their respective planets. The good news is this is pretty much the same process as our planets with a few minor changes. Let's get to it.
20 Select the Luna object either in the Viewport or in the Outliner.
21 Set the current frame to 0
22 Tap the s key on the keyboard to set a keyframe.
23 Set the current frame to 240
24 In the channel box change the Rotate Y attribute to 1440
25 Tap the s key on the keyboard to set another keyframe.
- Mars - Phobos
- Mars - Deimos
- Jupiter - Ganymede
- Jupiter - Callisto
- Jupiter - Europa
- Jupiter - Io
- Saturn - Titan
- Uranus - Oberon
- Neptune - Triton
- Pluto - Nix
Bonus points again for those who realize they can control + select multiple moons in the outliner (or shift + select in the viewport) and can set keyframes for all of them at the same time even though they fall in different planet groups.

At this point you have completed the third stage of creating the solar system which is "animation"
Its really scarry how good you are getting now.
Materials
Now that everything has been animated we just have a few more steps to complete before we can call this awesome project a success. A big thing is that right now all of our planets all look like cement marbles swinging around a big one in the middle. A big part of the pipeline is adding color and texture to our models. For this tutorial we are only going to go through the process of adding simple solid colors to our plaents and moons, but in the future this process will be much further fleshed out. Consider this a nice introduction though.
Here we go!
1 In your perspective viewport focus your camera on the sun and select it.
2 Right Mouse Button click and hold over the Sun sphere. This will bring up a marking menu.
3 Without releasing the mouse button press move your mouse down over Assign New Material and release.
At this point let's talk a little bit about materials.
Materials in Maya describe the base surface qualities of the objects they are applied to. The medium flat gray look that all of our objects have had so far is in-fact described by a material, the default Maya material which is titled lambert1. There are many base materials you can use in Maya and even more once we get into working with Arnold, but for now you can focus solely on 3 different base materials. Surface Shader has the qualities of solid color without any shading. Lambert has the qualities of non-reflective materials that have a flat look to them. Blinn and Phong are the materials that have reflective or shiny properties to them. Let's continue.

After selecting Assign New Material from the marking menu in step 3 you will get a material selection popup with a whole bunch of materials to choose from.
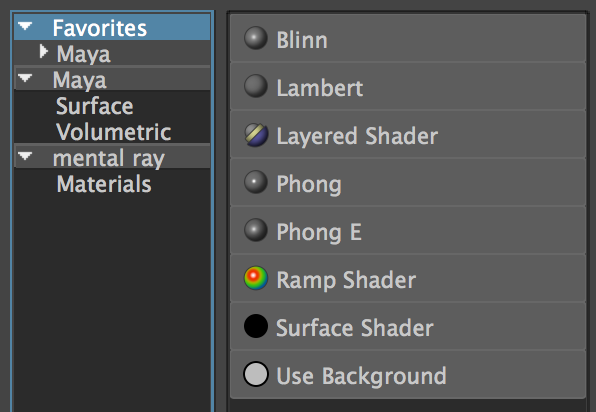
4 In the left column of the Assign New Material popup select FavoritesThis will filter the list on the right to just the basic maya materials.
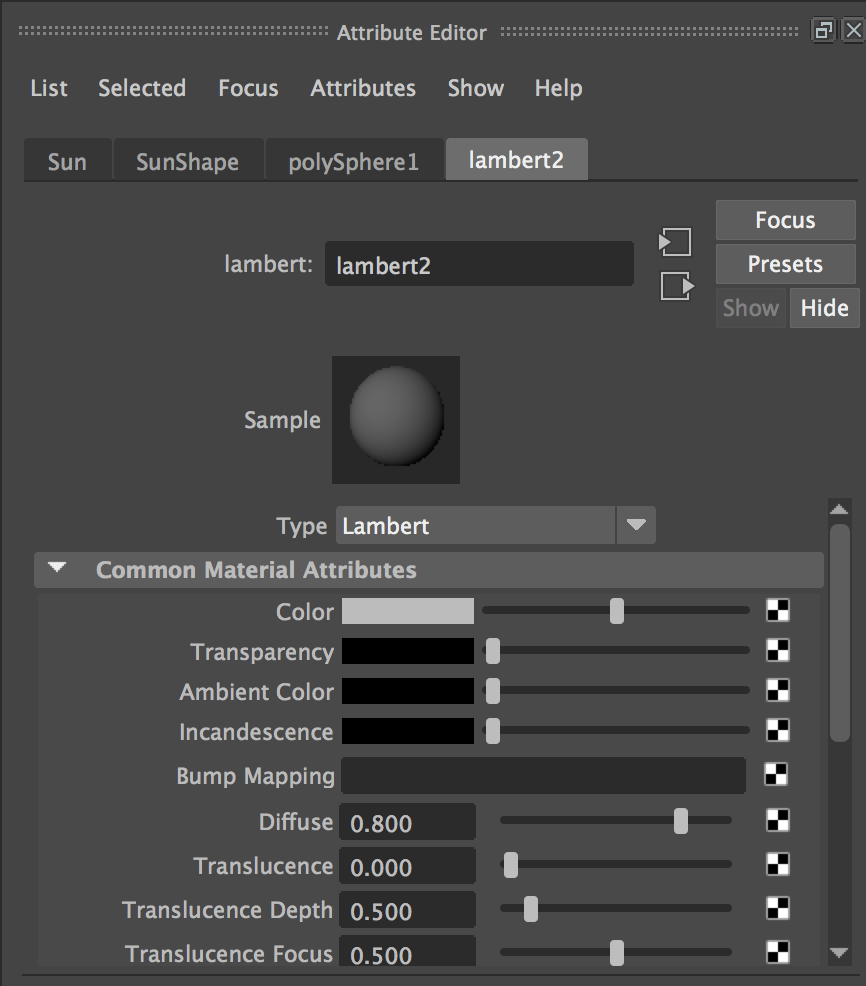
5 In the right list select Lambert. This will create a new Lambert material and assign it to the Sun object. It will also open up a new window called the Attribute Editor
The Attribute editor is similar to the channel box in that it allows you to adjust various attributes of selected nodes. However, the attribute editor is where you find a lot more options and settings for the nodes including tabs for all of the connected nodes for the object selected. In our case we want to make sure that the the lambert2 tab is selected in the attribute editor so we can work with it's properties to change the look of the Sun.
In the attribute editor for lambert1 you will notice some labels with color blocks, sliders and a little checker box (We'll get to this later in the semester) next to them. Each of these labels identifies a different attribute of the look of the lambert material. Some are more explanatory than others.
Color describes, you guessed it, the base color of the material. You can click on the color block to use the color picker and you can adjust the slider to brighten or darken that color once selected.
Transparency describes, you guessed it again, the transparency of the material or how "see through" it is. Typcially transparency is a linear value or shades of gray, black or white. Though it doesn't have to be.
Ambient Color and Incandescence adjust different looks of self-illumination for this material
Diffuse adjusts how much light is absorbed into the material. Lower values darken it while higher values brighten it. I encourage you to play with the rest of the attributes to see how they change the look. Some are more subtle than others.
6 Select the field that has lambert2 in it and rename it to Sun_Material
6 Select the color picker for the Color attribute and choose a bright yellow color
7 Select the color picker for the Ambient Color attribute and choose a somewhat dark reddish brown color
8 Select the color picker for the Incandescence attribute and choose a dark yellow color
9 Set the value for the Diffuse slider to 1.0

Take a look at what the Sun now looks like in the viewport. Pretty cool huh?!?
At this point you should follow these steps for each of the planets creating a new material for each and creating an interesting combination of colors to create the look you want. Be creative and have some fun. Don't forget to name the materials based on the look it is achieving.
While you are working on, I don't know, the moons and you have a Moon_Material that you would like to use on another moon you do not have to duplicate or replicate that material for each individual moon. In the Right Click marking menu rather than choosing Assign New Material Choose Assign Existing Material and then choose the one you want to reuse. The cool thing about this is any changes you make to that material will affect the look of all of the objects it is applied to.
At this point you have completed the fourth stage of creating the solar system which is "materials"
We are having so much fun at this point its crazy!
Batch Rendering - Maya Software Renderer
Note in the header of this section that we will be rendering this with Maya Software. The default renderer in Maya 2020+ is set to Arnold Renderer so you will first need to set your renderer to Maya Software. You can do that in the Render Settings dropdown at the top of that window or you can Watch this video on Render Settings
If you want to use Arnold (which is fine to do) please check out This Video Tutorial on rendering with Arnold and This Video Tutorial on Sequence Rendering with Arnold and apply those steps throughout this section.
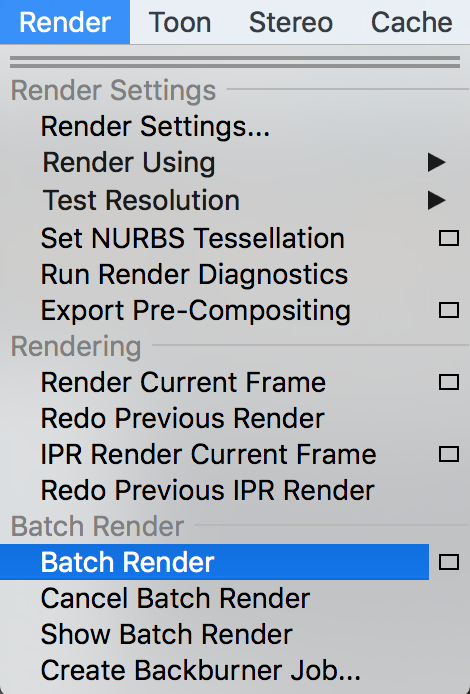
At this point our animation is ready for final processing. This is called rendering and is the process in which we let Maya calculate all of the aspects of our scene including models, shading, lighting and quality (among others) and produce the final full quality images that will become our final movie. You can do single frame renders that you can output a single saved image or you can setup a batch render to tell Maya to go through each frame within a range and render them out one by one. Since we have an animation we are going to be doing a batch render. Let's get started.
The first thing we need to do is move our perspective (persp) camera view to the location we want for our final rendered sequence.
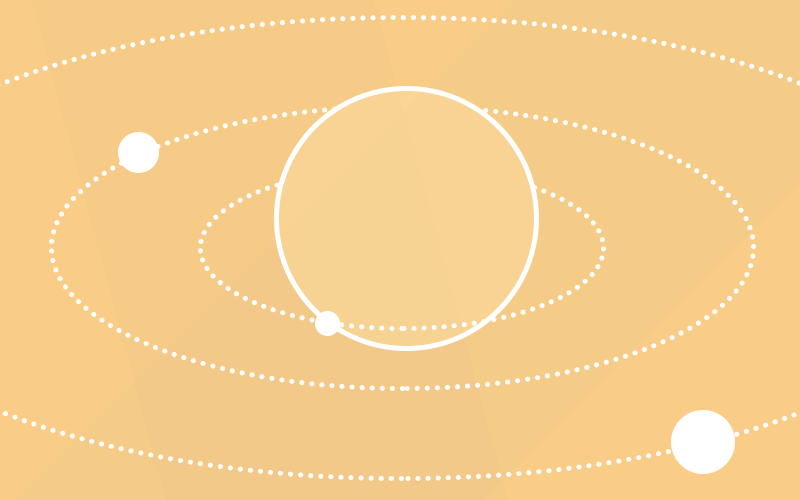
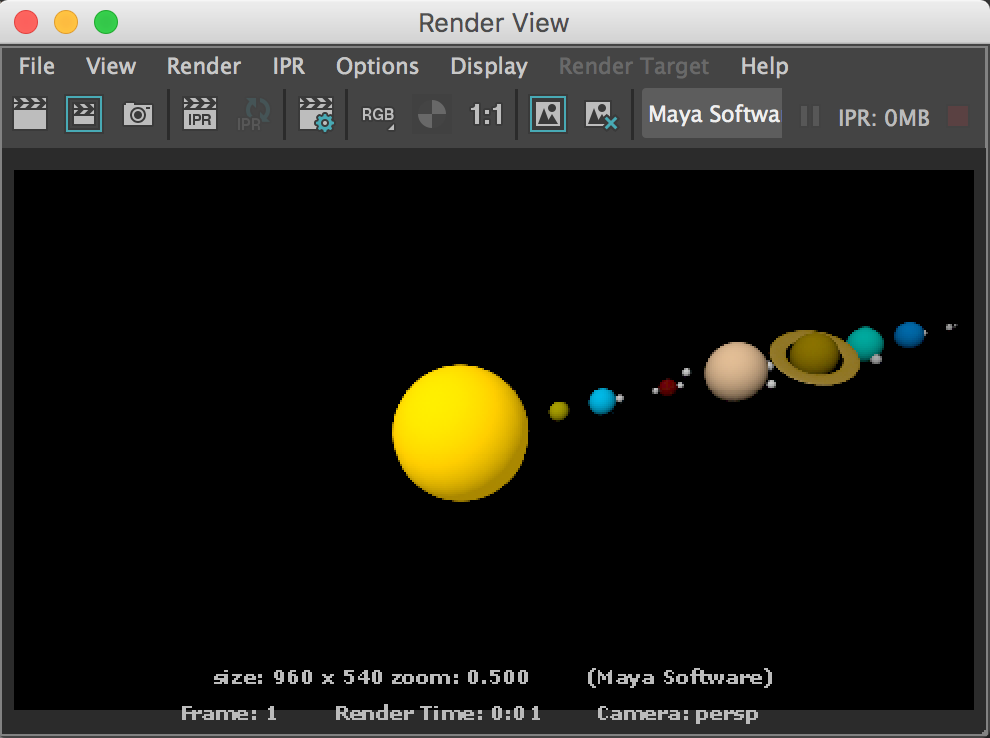
1 Using your standard camera controls (Alt + LMB, MMB an RMB) move your camera so you can see your solar system in an interesting but visible way. You could do something like the image here:
Notice the green box around our planets and the grayed out area around it with the numbers 960x540? Here we have something called the resolution gate enabled. The resolution gate shows you the exact region and dimensions of what your final output is going to be (Kind of like a cliche film director putting his fingers up in a square view frame on set). You can enable this by clicking on the little button with the box and the circle inside it just above the viewport.

Next let's do a couple of still frame test renders to make sure our materials end up looking the way we want.
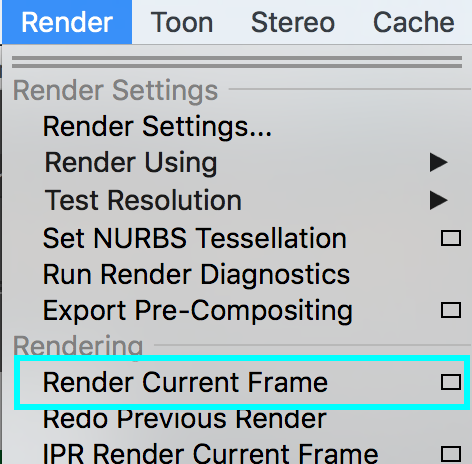
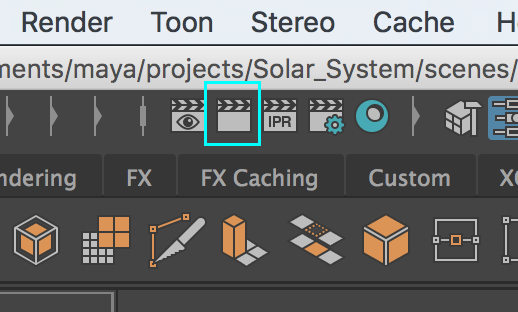
2 Change your menu set to Rendering and go to the Render menu and choose Render Current Frame or click on the Render button as outlined in the third image.
Rendering the current frame whether from the menu or the shortcut button will open the Render View and will show the final rendered image of the current frame progressing to completion.
3 At this point if you are unhappy with the look of any of your materials you should go and make those adjustments now before proceeding. However, if you are happy with it then feel free to proceed.
4 Using the timeslider change your current frame to different parts throughout the animation and do still frame render tests to ensure that everything will look more or less good througout your animation.
Once you are happy with your test render frames move on.
Now lets setup our batch render settings as well as our render quality settings.
5 You can open the Render Settings by either going to the Render menu or by clicking the button as hightlighted in the following image.

There are a ton of settings we can tweak but we are only going to focus on the main ones for this assignment.
6 First ensure that the drop down at the top where it says Render Using has Maya Software selected. Maya has many great renderers, but for now we want to keep it simple.
When rendering with Maya Software you should notice 2 main tabs across the top. Common and Maya Software. The Common tab contains, you guessed it, all of the common render settings can be found no matter what renderer you are using. The Maya Software tab contains all of the quality settings associated with the Maya Software Renderer.
- File name prefix: solarSystem
- This is the base file name for each frame that will be saved
- Image format: Windows Bitmap (bmp)
- This is the image format that will be rendered. We will be using Bitmap because it is uncompressed and doesn't have an alpha (transparency) channel.
- Frame/Animation ext: name.#.ext
- This describes the naming convention used for each frame. name will be replaced by the File name prefix above. # will be replaced by each of the frame numbers for each image. ext will be replaced by the extension for the Image format selected above.
- Frame padding: 3
- In order to keep our images in frame order we need to have leading 0's before the frame number so the alphebetical ordering on our computer doesn't muck things up. So frame 1 will use 001, frame 10 will use 010, frame 100 though won't have any leading 0's. This is because we only set the padding to 3 digits. Typcially you want to set the frame padding to the number of digits of the max frame number. So if your end frame is 1230 then a padding of 4 should be used.
- Start frame: 1
- This is the frame you want to start rendering from.
- End frame: 240
- This is the frame you want to render up to.
- By frame: 1
- This is the step count for frames. Setting this to 2 would render every other frame. 3 would be every 3rd frame. etc.
- Renderable camera: persp
- This is where you set through which camera you want your batch render to use.
- Presets: HD720
- This sets the overal final frame resolution (pixel dimensions x and y). HD720 is a preset that will set the horizontal resoltion to 1280 pixels and the vertical resoltion to 720 pixels
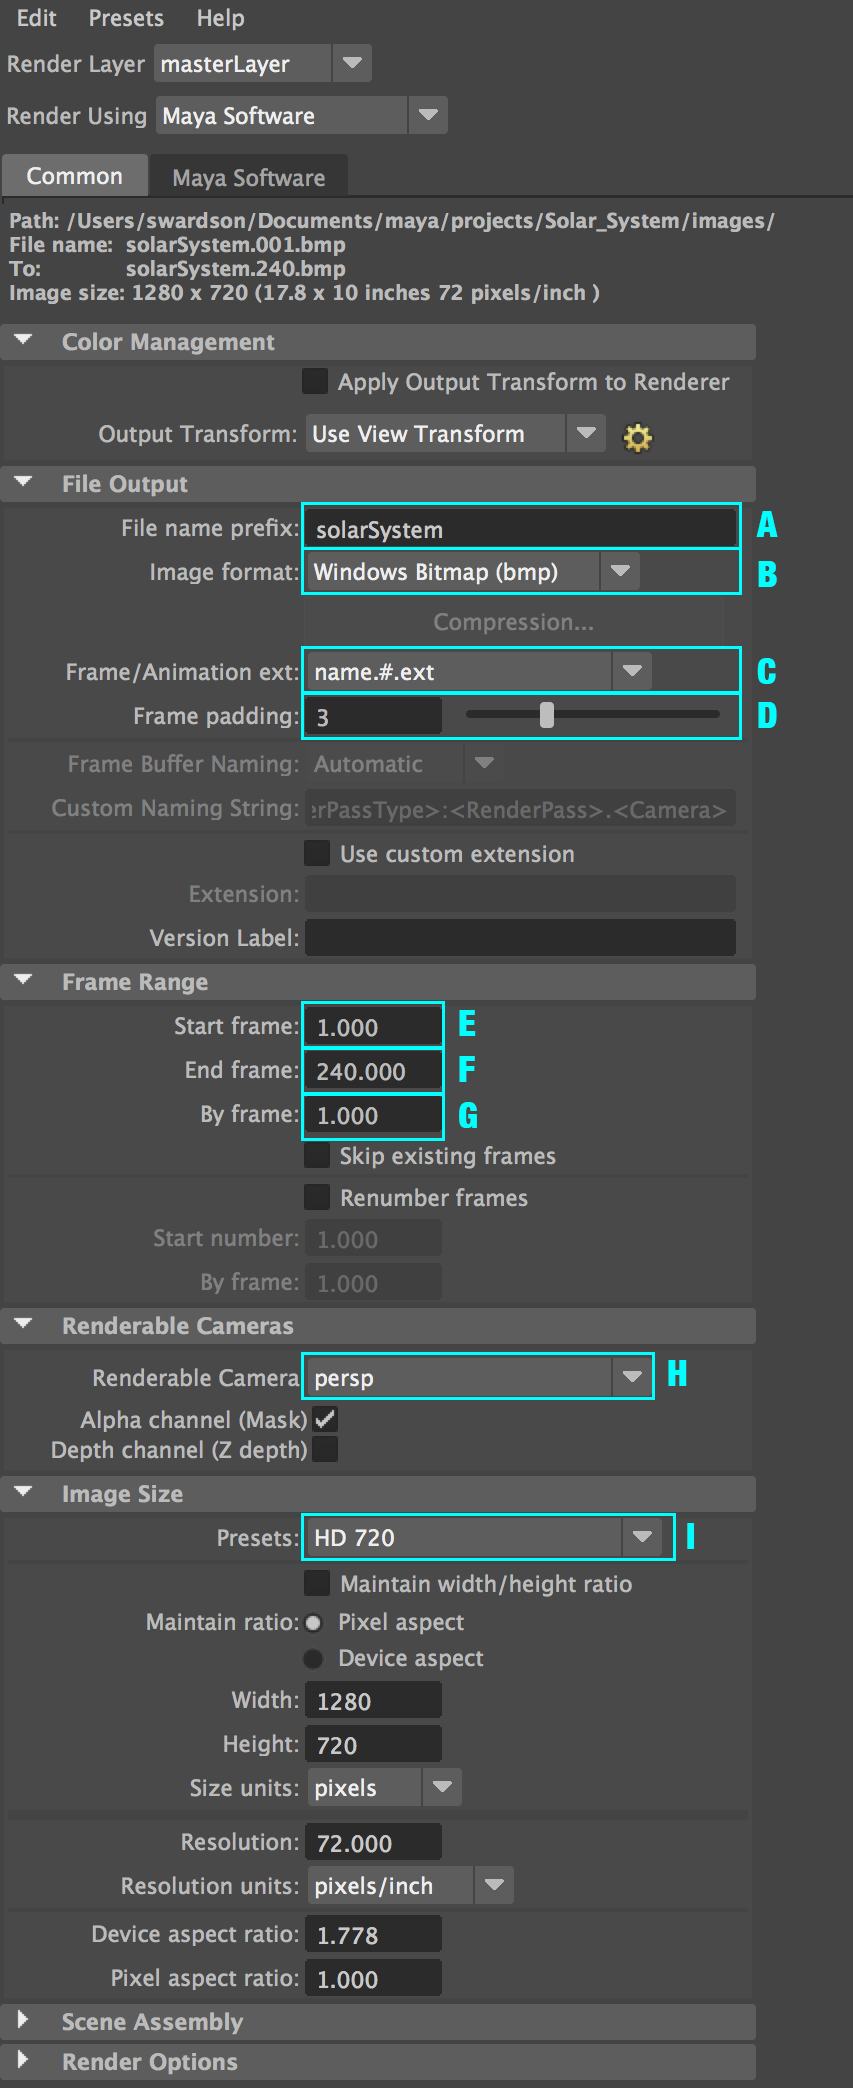
- Quality: Production Quality
- This is a list of presets for different levels of shading anti-aliasing samples. Production Quality sets the shading samples to 2 which means that each pixel will be shaded twice for more accurate and smooth results.
- Edge anti-aliasing: Highest quality
- Highest quality anti-aliasing computes the image in two passes, looking for color contrasts within pixels and in surrounding pixels, such as highlights. The first pass is the High quality computation—the second pass looks for color contrast in the results of the first pass. In the regions where color contrast is high (for example, in regions containing highlights), more shading samples are taken.
- Enable Use multi pixel filter
- If on, Maya process, filters, or softens the entire rendered image by interpolating each pixel in the rendered image with its neighboring pixels, based on the Pixel filter type and the Pixel filter width X, Y settings.
- Pixel filter type: Gaussian filter
- This filtering preset provides a good blend between softness and being sharp enough where details are not lost.

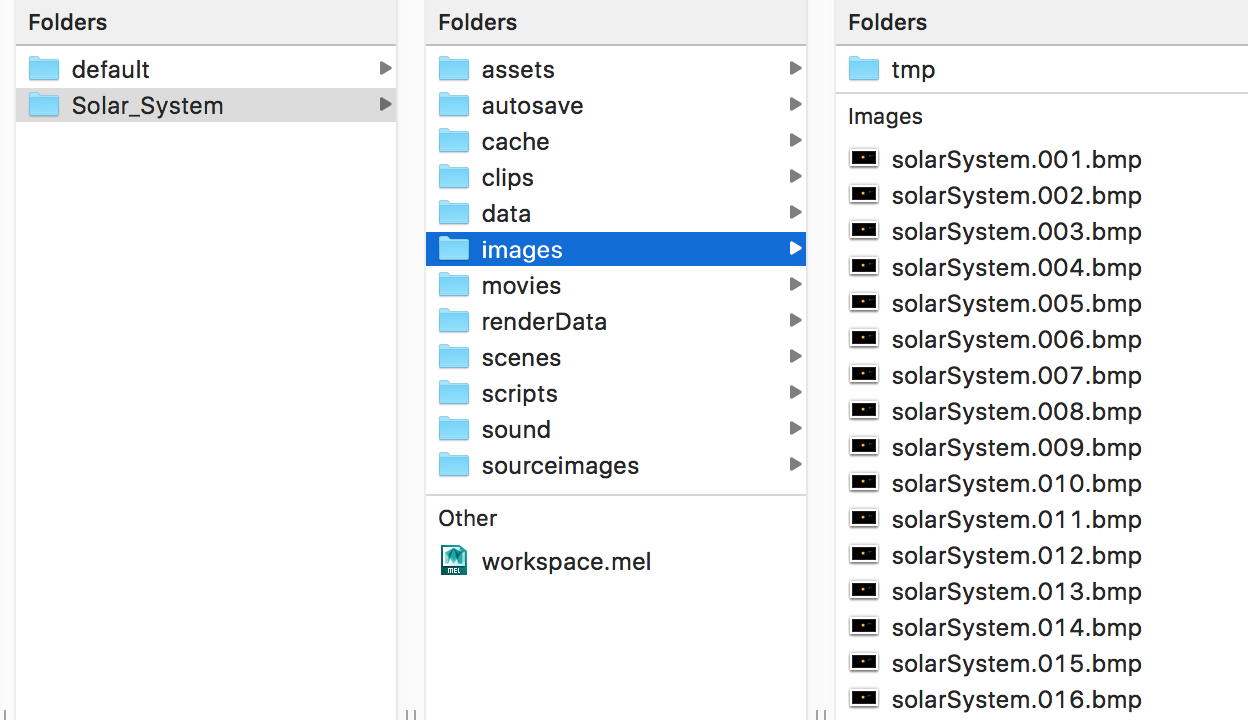
Before we should call this process done let's double check that our Maya project directory has been set by verifying where on our computer Maya is planning to write the rendered image files.
Once verified and corrected if needed we are now complete with our settings for batch rendering.

Now that our render settings are all setup it is time to kick off a batch render process and let Maya churn through our frames one by one and produce the final rendered images.
The little menu option box will show the batch render settings
During rendering Maya will provide you with status updates as to how it is going.


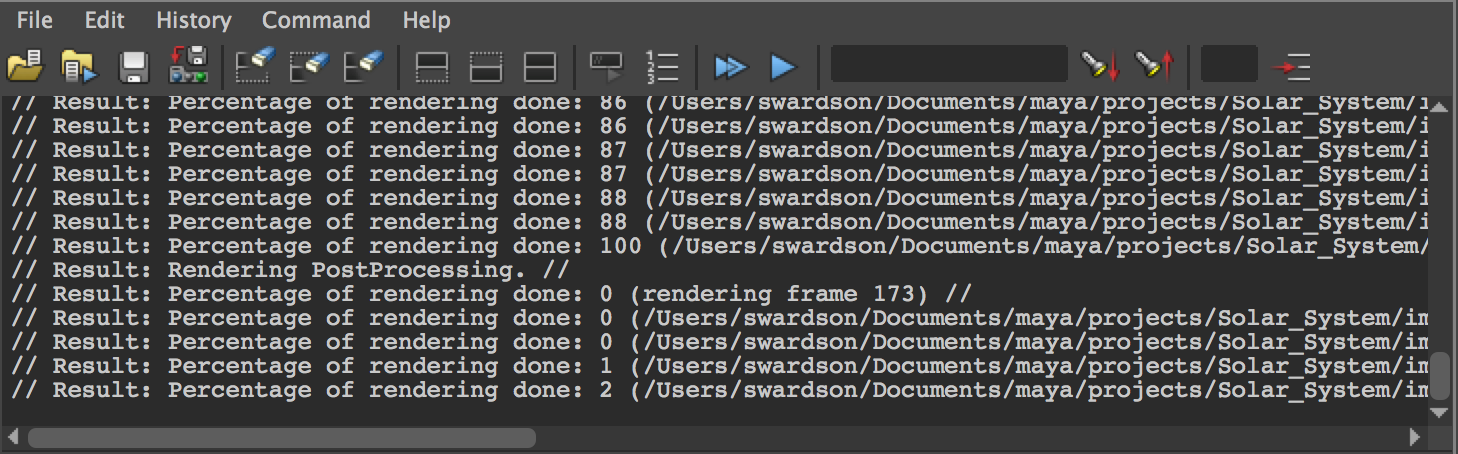

If you find any errors please refer back to the render settings section of this tutorial and ensure that you have set everything correctly and try again.
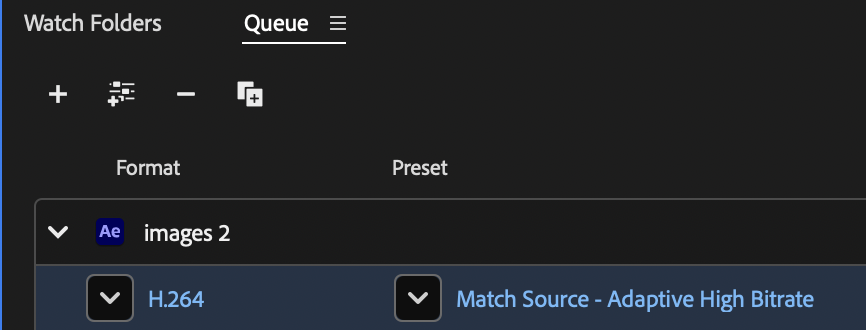
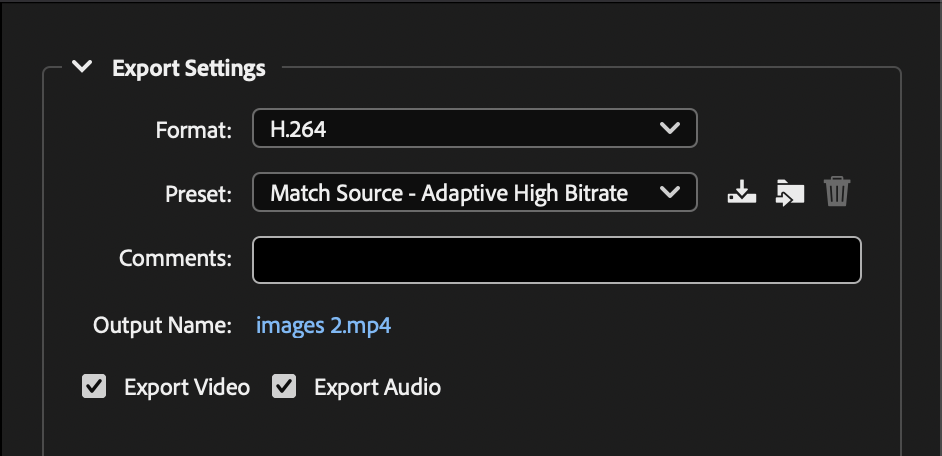
Frame Sequence to Movie
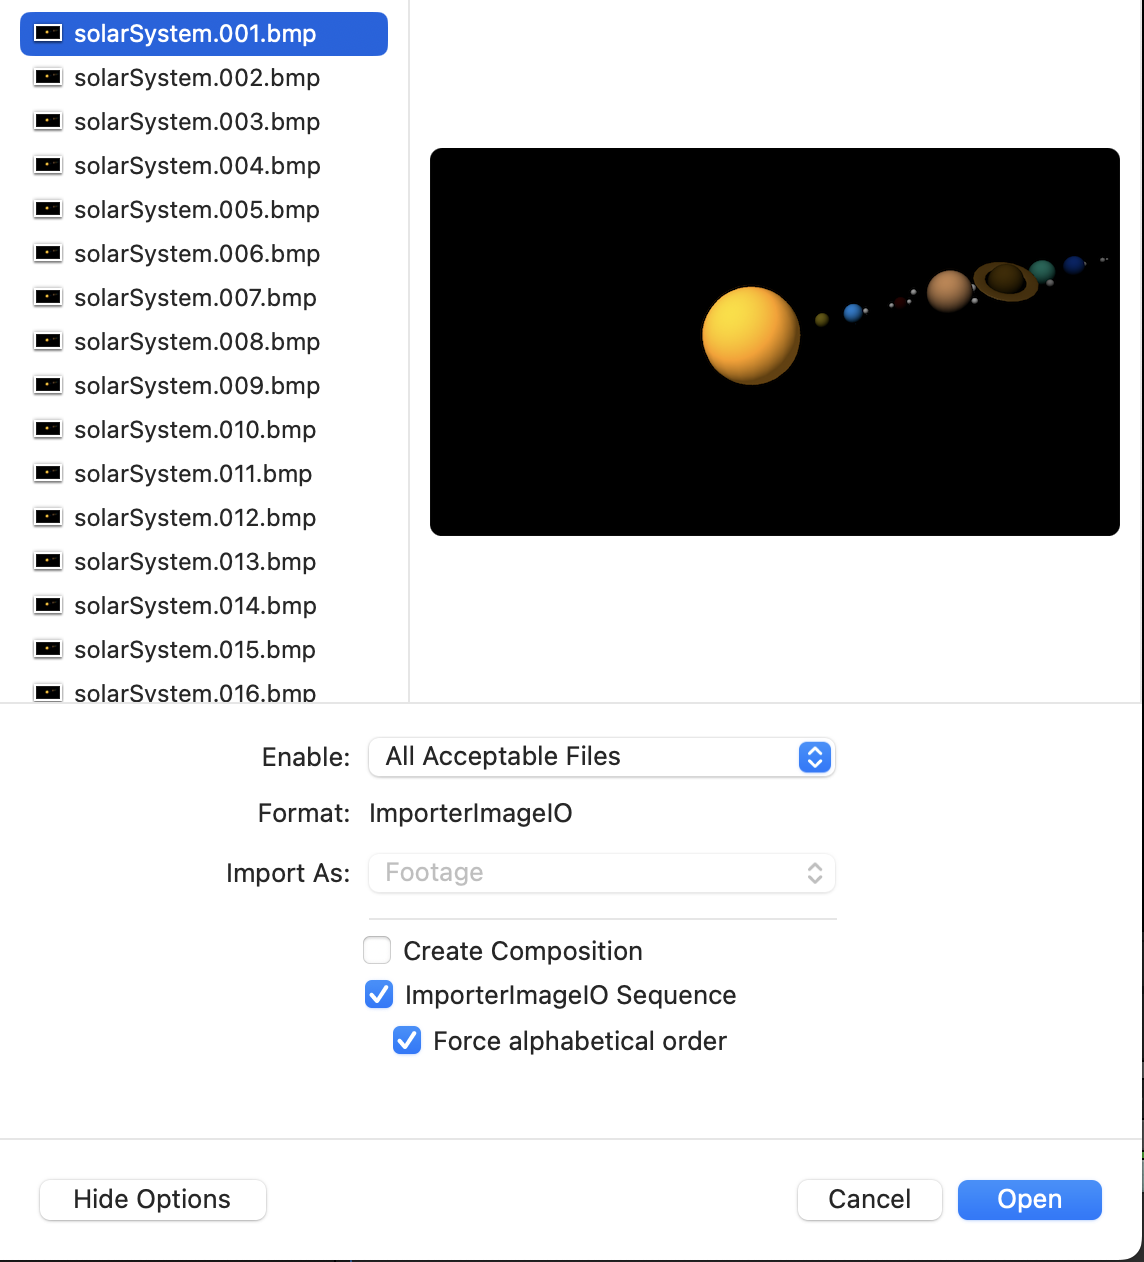
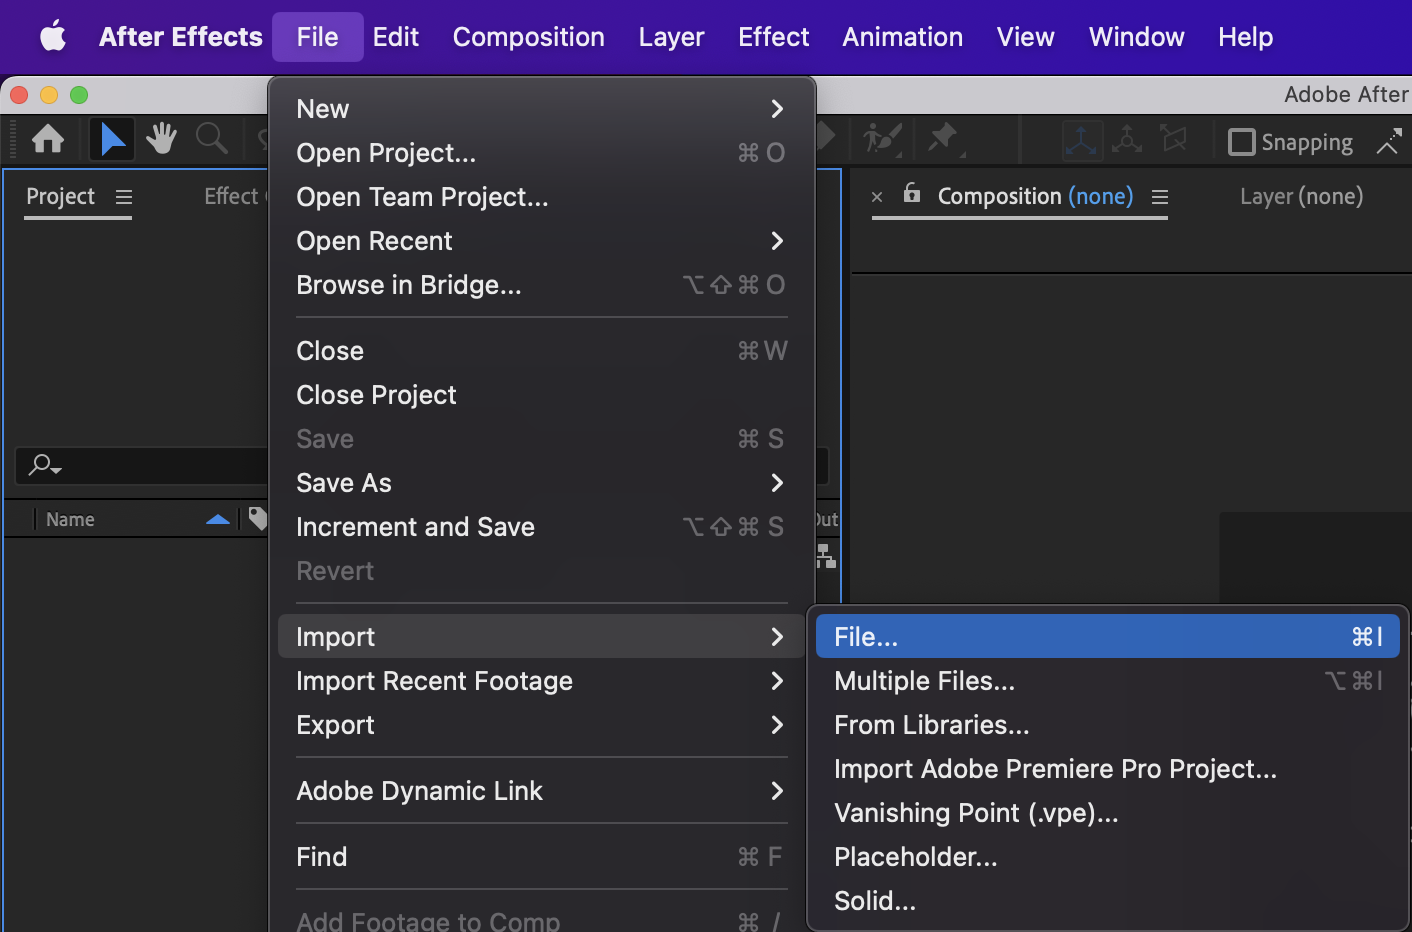
You may be tempted or even logically inspired to choose the multiple files option on import. Multiple files will import each file you have selected individually. We want to treat our sequence of frames as a single entity so Multiple Files isn't what we want.
Create Composition checkbox NOT selected.
ImporterImageIO Sequence checkbox is selected.
Force Alphabetical Order checkbox is selected.
If you rendered out your frames as .jpg it would show JPG Sequence, if they were .png files it would show PNG Sequence.